 |
|
 11-07-2012, 10:19 PM
|
#181
|
|
Senior Member
Join Date: Apr 2007
Location: Camano Island, WA
Posts: 163
|
We had the roll up doors on a couple of the fire trucks in the station I was part of, one of them had 6 foot high doors. We never had a drop of water get in, and ran the rigs in all kinds of crappy weather. They are great because you never have a door sticking out in the way. Only real disadvantage is you lose a bit of height in the compartment due to the rolling mechanism. we had both painted and clear anodized and both held up well. I am not sure what look I like better.
Kenn does great work, I have not been down in a while to see his progress in person, but what he had done last time was first class. I can't wait to visit and see the progress in person next time I can get down that way. Best part is he is actually getting it done, where mine is going to be stuck in the design phase for a while longer yet...
Dave
__________________
|

|

|
|
11-08-2012, 12:41 AM
|
#182
|
|
Senior Member
Join Date: Sep 2010
Location: Willamina Or
Posts: 277
|
 Doors
Doors
The total for the five doors was $2918. and $251 shipping total 3169. I don't remember how much the painting was. I will be adding some rubber seals to the door so it makes better contact with the bodywork when the door is closed. I don't remember any of the fire rigs that I worked with that ever leaked. The sales lady at one of the roll up door places told me that hinged doors had not advantages on roll up doors and I told her that on a rainy night you can't stand under a roll up door and you can with some of the tall hinged doors. Dave you are welcome anytime. I was hoping to have the truck road ready next week when my brother visits but I don't think it will happen. I might leave the truck with the lower unit on it in the shop and build a carport beside the shop before I start on the box.
__________________
|
|
|
|
|
11-21-2012, 11:05 AM
|
#183
|
|
Senior Member
Join Date: Sep 2010
Location: Willamina Or
Posts: 277
|
Moor body work
Last week my brother was in town for a few days so I had him help me install the rear body panel. We used a new rivet from Huck that is called a Huck Magna-bulb. These rives are 3/16" and are very strong in sheer. I borowed a huck tool from a friend and found out that I needed a $400. tip to make it pull the rivets. The salesman from (Dean Lewis fasterners in Vancover Wa) said if I had a strong air riveter that I could save the $400. He sent me a few samples and I was able to pop the rivets with my cheap air riveter from Harbor freight. I tried to pop one with a hand riveter and could not get it to move at all, strong rivets. We did about eight rivets and then the tool would not grip the rivets. My brother took the tool apart and found that I cracked a steel cone shaped part. I put it in the vice and tig welded it and we did another six before it cracked again. I welded it for the second time thinking we would be making a trip to get a new tool. We tried again and this time I lowered the air pressure to about 80 psi. The tool said 90 psi max and I have my air set at 110 psi. We keep adding pressure 5 psi at a time and found that the rivets need about 95 psi so we were able to do over 100 rivets by shutting off the compressor at 97 psi. I like the way the rivets end up with a strong steel pin locked in place. I then switched to aluminum rivets to hold the LPG access door on.
|
|
|
|
|
11-21-2012, 11:33 PM
|
#184
|
|
Senior Member
Join Date: Sep 2010
Location: Willamina Or
Posts: 277
|
Lights work
I had my brother help me with running four conductor cables for the headlights and the front turn signals. I used a new junction box. I left all of the rubber plugs in place as they are for seven conductor cables. I milled four 3/4" holes so I could run each cable through a grommet. Both headlights and turn signals have three wires so I used three of the four conductors in cable each cable. I had to fab up a bracket to hold the four cables in place because they are wire tied to the hood hinge that rotates ninety degrees when the hood is closed. The picture of the open box shows from left to right 1 ground white 2 marker lights black 3 right turn red 4 low beam green 5 left turn red 6 high beam black and 7 ground white. The grounds are connected with a jumper. It took a bit of doing and I wish both light mfgs used the same wire colors. It all worked and it should be water tight after some sealant. The picture of the fender underside shows how I ran the cables along the edge with clamps. The fenders have a heavy liner that is about 1 1/2" below the fenders. You can see the end of the turn signal with the red, white and black wires. It all worked.
|
|
|
|
|
11-28-2012, 05:15 PM
|
#185
|
|
Senior Member
Join Date: Sep 2010
Location: Willamina Or
Posts: 277
|
train horns
I got the train horns installed and working. Wow!!! they are loud. I mounted them from above and if I need to work on the air lines after the body (living quarters) is welded to the lower unit I might need to cut a hole in my floor. I have been doing some small stuff waiting for a day warm enough to paint the back body work.
|
|
|
|
|
11-28-2012, 06:47 PM
|
#186
|
|
Senior Member
Join Date: Nov 2010
Location: Grafton
Posts: 285
|
Quote:
Originally Posted by Kenn

I tried to pop one with a hand riveter and could not get it to move at all, strong rivets. We did about eight rivets and then the tool would not grip the rivets. My brother took the tool apart and found that I cracked a steel cone shaped part. I put it in the vice and tig welded it and we did another six before it cracked again. I welded it for the second time thinking we would be making a trip to get a new tool. We tried again and this time I lowered the air pressure to about 80 psi. The tool said 90 psi max and I have my air set at 110 psi. We keep adding pressure 5 psi at a time and found that the rivets need about 95 psi so we were able to do over 100 rivets by shutting off the compressor at 97 psi. I like the way the rivets end up with a strong steel pin locked in place. I then switched to aluminum rivets to hold the LPG access door on.
|
Nice work. What kind of a hand riveter did you use? Handles as long as a Channel-Lock? I used some big rivets recently and borrower one that had handles about 2 feet long and that really worked slick. Never used an air riveter. I wanted to borrower one, but they guy who loaned me the big one said don't use the air on big rivets. Use a BIG manual riveter for the big ones. Worked fine.
Did you consider using aircraft bucked rivets? Probably more work.
Only three lights in back?
Nice train horns. Is it common to mount them pointing down like that? I suppose you don't have any room above the cab with the attic.
I suppose the way the train horns work there is only ONE volume ... LOUD! Or can you control the level of sound?
__________________
Started looking for 379 Peterbilt TC, 24' to 30' box, bumper pull--but ended up w/1999 Liberty Coach conversion of 45' Prevost XLV bus. 1,000sf heated/AC'd race shop w/dump station, 50amp shore pwr where bus parks, 3 NASCAR/ARCA race cars & 26' Bravo trailer.
|
|
|
|
|
11-30-2012, 01:24 AM
|
#187
|
|
Senior Member
Join Date: Sep 2010
Location: Willamina Or
Posts: 277
|
The hand riveter I tried was a small one. I used a lot of solid aluminum rivets on my race car tub and seat. I was able to get to the backside with a buck. The panel on the rear of the truck is riveted to tubing so I needed to use some type of blind rivet. The Huck steel rivets are stronger than the aluminum solid rivets in sheer.
The lights will be two red stop, turn and tail and a white back-up on each side. The back-up lights will be controlled with a switch on the dash so that I can have light with the truck out of gear for hooking up to the trailer in the dark.
You are right, no room on the roof for the horns. I tried to find room under the cab but decided they would be out of the way on the end of the motorhome. I pointed them down so no water or dirt would get in. Sitting in the shop I can control the air valve pretty good and not give them a full blast but driving down the road may be another story.
|
|
|
|
|
11-30-2012, 10:18 PM
|
#188
|
|
Senior Member
Join Date: Nov 2010
Location: Grafton
Posts: 285
|
Train Horns
As I type this ... I'm listening to a train horn on a real train about 2 miles away! Sometimes I think the real, underlying reason I want a truck conversion is so I can put train horns on it!
__________________
Started looking for 379 Peterbilt TC, 24' to 30' box, bumper pull--but ended up w/1999 Liberty Coach conversion of 45' Prevost XLV bus. 1,000sf heated/AC'd race shop w/dump station, 50amp shore pwr where bus parks, 3 NASCAR/ARCA race cars & 26' Bravo trailer.
|
|
|
|
|
12-05-2012, 07:55 PM
|
#189
|
|
Senior Member
Join Date: Sep 2010
Location: Willamina Or
Posts: 277
|
cold weather painting
Today the weather let me paint the back of the body work. I had the truck almost all of the way out of the shop and masked off the back. I used gas heaters and with the outside temp at 47 I got the shop up to 60. I shut off the heaters and shot the primer. I used small electric heaters after about an hour. I shot the white at 3 pm and by 5 I was able to use the electric heater and the paint is dry to the touch. We are in for a could spell so it feels good to have the paint done.
|
|
|
|
|
12-05-2012, 08:41 PM
|
#190
|
|
Senior Member
Join Date: Jul 2011
Location: Tomball
Posts: 1,414
|
love the progress !
__________________
Don R.
'04 Haulmark (M42386) 42', 2 slide, 10kw - Pictures
'04 F350 CrewCab Longbed 4x4, 50g aux tank & gear vendors dbl over
|
|
|
|
|
12-10-2012, 12:26 AM
|
#191
|
|
Senior Member
Join Date: Sep 2010
Location: Willamina Or
Posts: 277
|
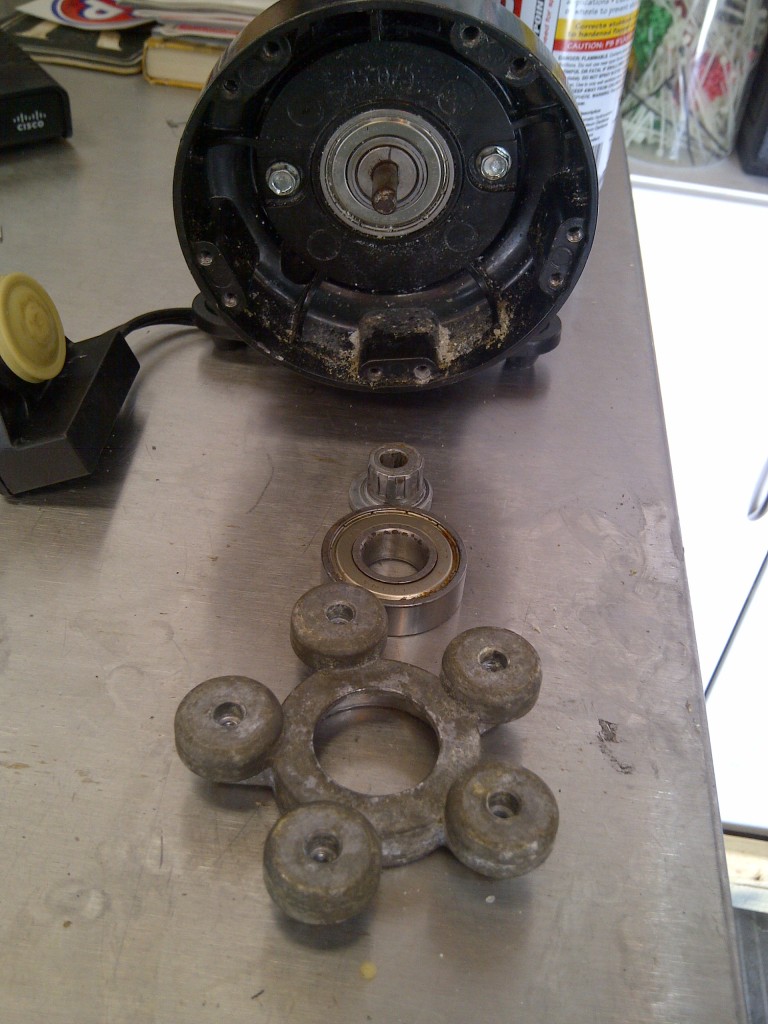
water pump
Today I mounted the water pump and a small cooling fan. The first picture shows the fan mounted to the back wall of a compartment. Below the fan are four 7/8" holes to let the air out of the pump box and back into the compartment. The next picture is of a cover to protect the fan from being damaged while driving. I used a small stainless steel dish and punched about forty 1/4" holes around the edge to let air into the pump. Below I used a round fog light grill to cover the return air holes. I tested it and it moves enough air to keep the pump cool (I think). The third picture is of the pump mounted on the back side of the compartment. You can see the fan hole above the pump and the four return air holes below. The last picture is of the box I covered the pump with. I used putty tape to seal it to the compartment. The inlet is on the left with a small screen/filter and the discharge is on the right.
|
|
|
|
|
12-10-2012, 06:00 AM
|
#192
|
|
Senior Member
Join Date: Sep 2012
Posts: 135
|
This fan is for cooling the water pump used for showers and what not? Why? Doesn't the water itself transfer heat adequately? Just wondering.
|
|
|
|
|
12-10-2012, 08:59 AM
|
#193
|
|
Senior Member
Join Date: Feb 2009
Location: St. Paul, MN
Posts: 1,819
|
Looks neat, Kenn. But, I'm not sure you need to worry about cooling the pump. My pump is mounted under the bed in an enclosed compartment that gets no air flow. Been working great for 10 years. I think they must use the water to keep cool.
__________________
'03 Freightliner FL112, 295" wheel base, with '03 United Specialties 26' living quarters, single screw, Cat C12 430 h/p 1650 torque, Eaton 10speed , 3.42 rear axle ratio
|
|
|
|
|
12-10-2012, 10:47 AM
|
#194
|
|
Senior Member
Join Date: Sep 2010
Location: Willamina Or
Posts: 277
|
My old motor-home had the pump mounted in the compartment that held the water tank. The area was much larger than the small (10 x 4 x 6) box that this pump is in. The mounting instructions say "the pump should be located in a ventilated space" so I added the fan.
|
|
|
|
|
12-11-2012, 11:02 AM
|
#195
|
|
Senior Member
Join Date: Jul 2011
Location: Tomball
Posts: 1,414
|
i just had a shurflo pump fail....ive pulled it apart & am awaiting parts (valve body)...
I see that Kenn is running a strainer but i'll reiterate anyway - make CERTAIN youre running a $8 STRAINER or youll shorten the life of the pump/valve diaphragm too.
our pump is under the bed too...close to the tanks (twin 60 gallon-ers)...ive held the pump when its running....theres little or no heat in it (and its SEALED, w/ out any vents in the casing)...even running the pump (in my hand) w/ no water flow thru the pump did NOT generate enough heat in the motor/casing to speak of.
from what ive witnessed - theres little if any cooling effect from the flowing water to the spinning motor case...id call it ZERO but ill be conservative and anticipate that the water flowing thru the aluminum diaphragm case MIGHT transfer some cooling to the case of the electric motor...its negligible at best.
these pumps also have built in thermal protection & overload circuits (which i also witnessed)
for those that arent aware (i wasn't), these pumps dont SPIN water thru (like the typical impeller pumps im used to)...they push/pull it thru via diaphragms...which is why they dont have much lift.
fwiw, if you care - in my case the diaphragm was leaking slightly & moisture got to the bearing & eventually took out the bearing. If your pump is periodically running (even w/ the faucets off) & you cant find a leak....suspect the diaphragm...they dont last forever !
as they say....its always somethin' ! 


__________________
Don R.
'04 Haulmark (M42386) 42', 2 slide, 10kw - Pictures
'04 F350 CrewCab Longbed 4x4, 50g aux tank & gear vendors dbl over
|
|
|
|
|
12-12-2012, 09:57 PM
|
#196
|
|
Senior Member
Join Date: Sep 2010
Location: Willamina Or
Posts: 277
|
water tank
Today I mounted the water tank. I tried to use 1/8" rubber between the straps and the tank but I had to use 1/16". I used soapy water on the rubber so I could adjust the straps after I got the bolts started. It all came out fine. I like the look. Next us are the rear lights.
|
|
|
|
|
12-13-2012, 12:35 AM
|
#197
|
|
Senior Member
Join Date: Jul 2011
Location: Tomball
Posts: 1,414
|
wait...im confused...i didnt realize that the water tank was gonna be in the position of one of the fuel tanks.
how much fuel will you have (for highway/genset) ??
how big is that water tank ? im guessing 60 gal ? is that the only water tank ?
__________________
Don R.
'04 Haulmark (M42386) 42', 2 slide, 10kw - Pictures
'04 F350 CrewCab Longbed 4x4, 50g aux tank & gear vendors dbl over
|
|
|
|
|
12-13-2012, 01:03 AM
|
#198
|
|
Senior Member
Join Date: Sep 2010
Location: Willamina Or
Posts: 277
|
water tank
When I bought the truck it had two 130 gallon fuel tanks mounted behind the cab. The tank on the passenger side was a split tank with about two thirds fuel and one third hydraulic oil. Below the passenger door was a tool box with steps. I swapped the tank and tool box for some of the labor cost of removing the front drive axle and building a new driveline. The fuel tank on the drivers side had a wide set of steps. I cut down the steps and mounted the passenger side tank brackets under the pass door. I will end up with 130 fuel for the truck, 50 propane for the genset and other stuff. The water tank is 55 gal. My old motorhome had a 40 gal water tank and I never ran low on water. By putting the water tank in the fuel tank I was able to free up space for larger storage compartments.
|
|
|
|
|
12-13-2012, 12:41 PM
|
#199
|
|
Senior Member
Join Date: Apr 2007
Location: Camano Island, WA
Posts: 163
|
Just don't go filling up your tanks when you are super tired or the morning after too many beers....you may end up with funny tasting water, and a truck that does not run...lol Funny as it sounds a few years ago I had a new firefighter fueling up our engine, and they ended up topping off the widow washer tank with diesel. On our freightliner fire truck the washer tank filler is on the same side as the fuel tank, and even thought well labeled they still managed to fill the wrong one. I know something was wrong when the firefighter asked me why we had to fill up because it only took just over a gallon... Drained and cleaned the tank and it still smeared the windows for a very long time.. Made for a good blooper award at our banquette though.
Seriously though, I think what you have done is a great use of space, and 130 gal of fuel should be plenty. First class job on getting the plastic tank inside the fuel tank, and some hard work polishing it all up too.
Dave
|
|
|
|
|
12-15-2012, 10:17 AM
|
#200
|
|
Senior Member
Join Date: Nov 2010
Location: Grafton
Posts: 285
|
Couple of comments ...
First: I was confused, then I thought I had it figured out, now I'm confused. I've figured it out that the water tank is below the driver's door. Is the water being held in the aluminum tank? Or is the water being held by a plastic tank inside the aluminum tank? I think this is a good idea. The only downside is that if and when it gets cold, the water outside the truck/motorhome is more likely to freeze than if it were inside the motorhome box, say under the bed.
Second: We crewed for an ARCA/NASCAR Cup stock car team for a few years. Their hauler (semi-tractor with 53' lift gate race trailer) had a modest sized tank for race fuel (110 octane) which was a separate tank mounted behind the regular fuel tank on the pax side and it had a filler with a small cap mounted "far back"; hard to get to. They were racing down south and contracted with an experienced truck driver to bring the rig back to Wisconsin while the crew flew home. At the next race they went out for practice and the car ran for crap. They couldn't figure out what was wrong. No power. Finally the spotter, who had climbed down from the spotter stand and was looking at the motor leaned over, touched his finger to a little liquid on the side of the carb, smelled it, and announced confidently: DIESEL FUEL!. Engine builder said, "Change the engine." You guessed it ... the substitute driver had put diesel in the race fuel tank.
Did you move the 130gal diesel tank on the driver's side forward too? Watch your weight on the front axle. I'm curious how much moving that weight forward will impact front axle weight.
Keep up the good work!
__________________
__________________
Started looking for 379 Peterbilt TC, 24' to 30' box, bumper pull--but ended up w/1999 Liberty Coach conversion of 45' Prevost XLV bus. 1,000sf heated/AC'd race shop w/dump station, 50amp shore pwr where bus parks, 3 NASCAR/ARCA race cars & 26' Bravo trailer.
|
|
|
|
|
|
 Posting Rules
|
You may not post new threads
You may not post replies
You may not post attachments
You may not edit your posts
HTML code is Off
|
|
|
|
 » Recent Threads
 |
|
|
|
|
|
|
|
|
|
|
|
|
|
|
|
|
|
|
|
|
|
|
|
|
|


 Linear Mode


