Journey with Confidence RV GPS App RV Trip Planner RV LIFE Campground Reviews RV Maintenance Take a Speed Test Free 7 Day Trial ×

Go Back   Truck Conversion & Toterhome Community > Truck Conversion Talk > Building Your Own
Click Here to Login
Register FAQ Community Calendar Today's Posts Log in

Join Truck Conversion Today
Reply
 
LinkBack Thread Tools Search this Thread Display Modes
 
Old 09-07-2023, 11:39 AM   #121
Senior Member
 
Pntyrmvr's Avatar
 
Join Date: Mar 2019
Location: GTA
Posts: 154
Default

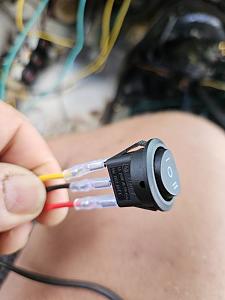
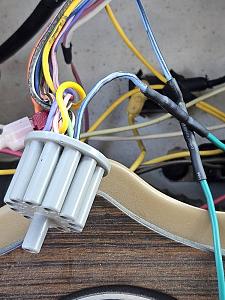
Using 3 kinds of switches.

The PCM harness needs a push button to activate the starter. You'll put the key to run and then push a start button to crank it over.

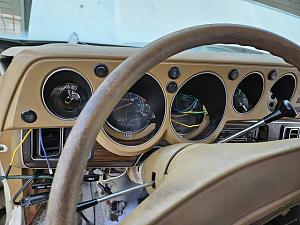
The fuel sender in the small Nissan Micra tank can be selected to display on the factory fuel gauge through a splice made on plug G at the back of the instrument panel. The sender is the same ohm rating as the old Dodge sender and gauge.

The 3 extra gauges- temperature, pressure, and vacuum are to help tune the overdrive circuit.

A vacuum switch opens at whatever vacuum level is selected and shuts power off to the OD circuit. As the throttle opens the vacuum drops and the transmission goes back to third gear. The vacuum gauge helps tune that point.

The electrical pressure gauge has a sender on both the engine oil pressure port and the transmission governor port. Both run into a selector switch. The governor port puts out 1 psi per mph so there are 2 adjustable pressure sensors tapped into it along with one of the pressure gauges senders. The idea is to have the transmission shift into overdrive at, say, 42 mph and then the torque converter clutch lock up at 46 mph. With the gauge switched to transmission the shift points can be monitored for possible adjustment. Once that is complete the gauge is switched to engine oil pressure.

The final selector switch is for the temperature gauge. One sensor in the return line for the transmission cooler to see how efficient it is and the other behind the engine coolant thermostat to help set the electric cooling fan switch temperature setting.

The overdrive and torque converter lockup circuit can be switched on with a lighted LED switch. The click clack transfer pump from the 50 gallon tank to the Nissan tank containing the fuel injection pump works on a similar switch with a red LED. That switch can only run until the Nissan tank shows full.

The auxiliary gauges aren't shown. They'll sit on the doghouse until various tuning is complete.Click image for larger version

Name:	20230905_130919.jpg
Views:	2
Size:	45.0 KB
ID:	3686Click image for larger version

Name:	20230905_135538.jpg
Views:	2
Size:	98.5 KB
ID:	3687Click image for larger version

Name:	20230906_160326.jpg
Views:	2
Size:	92.7 KB
ID:	3688
__________________

Pntyrmvr is offline   Reply With Quote
Old 09-09-2023, 07:27 PM   #122
Senior Member
 
Pntyrmvr's Avatar
 
Join Date: Mar 2019
Location: GTA
Posts: 154
Default

The 7 holes in the hood latch support represent 5% of the exposed rad face. Every bit helps.

Testing the instrument lights circuit for the new push button start. Still needs the key, but this button runs the starter through the PCM.

More of that roll of steel strap. This time as mounts for added relay box-

Overdrive/torque converter lockup up.

Auxiliary alternator field circuit via key to RUN.

Click clack fuel transfer pump from main to fuel injection (Nissan) tank.

AC compressor. Truck had dealer air with no relay to engage AC clutch. Modern compressor with new clutch might need some protection via a relay and fuse.

The relay box will get spun 180° to keep that gaping hole out of any weather.Click image for larger version

Name:	20230909_132651.jpg
Views:	2
Size:	101.3 KB
ID:	3689Click image for larger version

Name:	20230909_161027.jpg
Views:	2
Size:	76.1 KB
ID:	3690Click image for larger version

Name:	20230909_181636.jpg
Views:	2
Size:	60.4 KB
ID:	3691Click image for larger version

Name:	20230909_182630.jpg
Views:	2
Size:	95.2 KB
ID:	3692
__________________

Pntyrmvr is offline   Reply With Quote
Old 09-13-2023, 04:19 PM   #123
Senior Member
 
Pntyrmvr's Avatar
 
Join Date: Mar 2019
Location: GTA
Posts: 154
Default

Gave up trying to use the aftermarket relay box. Too confusing.

Now 4 separate water proof relays and 5 water proof fuse holders.Click image for larger version

Name:	20230913_141720.jpg
Views:	1
Size:	94.9 KB
ID:	3693
Pntyrmvr is offline   Reply With Quote
Old 09-13-2023, 04:38 PM   #124
Senior Member
 
Pntyrmvr's Avatar
 
Join Date: Mar 2019
Location: GTA
Posts: 154
Default

I super glued the fuse holders to their respective relays. Also soldered the relays output wires directly to its matching pin in the fuse holder thereby eliminating 4 joints in the wiring. And making the whole thing a bit more compact.
Pntyrmvr is offline   Reply With Quote
Old 09-16-2023, 10:46 AM   #125
Senior Member
 
Pntyrmvr's Avatar
 
Join Date: Mar 2019
Location: GTA
Posts: 154
Default

All the switches in place and dash back to semi normal.

Fuses and relays tucked in box. Old school voltage regulator is for second alternator feeding house battery. The VR is adjustable and will get bolted up once I get the engine running and set the voltage through a pot in the back of the unit.

Put a RUN circuit bus in as everything new seems to need a connection with key in RUN to function. Mounted it where not poor slob can get at it. And see it. Love the old clutch rod hole plu in the floor for getting through the firewall all neat and tidy.


Click image for larger version

Name:	20230914_150811.jpg
Views:	1
Size:	81.3 KB
ID:	3694Click image for larger version

Name:	20230914_144752.jpg
Views:	1
Size:	99.6 KB
ID:	3695Attachment 3696
Attachment 3697
Pntyrmvr is offline   Reply With Quote
Old 09-17-2023, 06:00 PM   #126
Senior Member
 
Pntyrmvr's Avatar
 
Join Date: Mar 2019
Location: GTA
Posts: 154
Default

Two photos of the key at RUN + bus.Click image for larger version

Name:	20230911_163357.jpg
Views:	1
Size:	97.7 KB
ID:	3698Click image for larger version

Name:	20230911_151142.jpg
Views:	1
Size:	94.8 KB
ID:	3699
Pntyrmvr is offline   Reply With Quote
Old 09-17-2023, 06:12 PM   #127
Senior Member
 
Pntyrmvr's Avatar
 
Join Date: Mar 2019
Location: GTA
Posts: 154
Default

This is the early hemi accelerator pedal position sensor box. I used this because the A518 transmission needs a throttle position signal through its TV (throttle valve) cable. It does the same thing as the old kickdown rods.

I added the box at the left side to bring the TV cable in opposite the pedal cable. It's made up of leftover 1-1/4" steel strap from the Nissan gas tank. Handy stuff.

The pivot is a drilled out hole in the arm. The TV cable needs no slack and 1-1/2" travel. Same as the pedal so the math works out. The pivot bolt rides in a machined down "holed binder bail" that I reduced to fit by chucking it in my drill and pushing it against a file. Aluminum chewed down to size easily. Lots of anti seize and a few washers and bolts and it's done. No $300 Chev throttle body using a cable.

Important to put key to run and slowly cycle gas pedal once to teach PCM the range from idle to WOT.

Also the box is not yet attached to the engine as there are lots of pieces fighting for space.

Click image for larger version

Name:	20230916_172029.jpg
Views:	2
Size:	86.7 KB
ID:	3700Click image for larger version

Name:	20230916_172026.jpg
Views:	2
Size:	71.6 KB
ID:	3701Click image for larger version

Name:	20230916_172014.jpg
Views:	2
Size:	95.7 KB
ID:	3702
Pntyrmvr is offline   Reply With Quote
Old 09-19-2023, 07:56 PM   #128
Senior Member
 
Pntyrmvr's Avatar
 
Join Date: Mar 2019
Location: GTA
Posts: 154
Default

Now to get a cold air intake working.

Pulled the throttle body off and gave it a clean while it was out.

Found a plumbing coupler. Fits on throttle body and is made of some kind of rubbery plastic. Drilled a 1/2" hole in it for the 9/16" diameter air intake temperature sensor. Jammed it in. I am hopeful it will stay put and not get eaten by the intake.

Next is a cold air hose to the KnN cone filter.Click image for larger version

Name:	20230918_143512.jpg
Views:	1
Size:	95.5 KB
ID:	3703Click image for larger version

Name:	20230918_144852.jpg
Views:	1
Size:	54.5 KB
ID:	3704Click image for larger version

Name:	20230918_144855.jpg
Views:	1
Size:	64.3 KB
ID:	3705
Pntyrmvr is offline   Reply With Quote
Old 09-21-2023, 06:04 PM   #129
Senior Member
 
Pntyrmvr's Avatar
 
Join Date: Mar 2019
Location: GTA
Posts: 154
Default

Found 3 inch cold air intake tubing on Amazon.

Had to cobble it to an old B van cold air pipe and the 2007 Aspen air box gasket yo match up with a K&N filter. Used aluminum HVAC tape to seal the joints and then covered them with black Gorilla tape for looks.

Found a PCV filter with a 3/4" ID nipple and clamp for cheap. That hooks up with a 3/4×3/4 barb fitting and a piece of curved hose off the 2007 Aspen's gas tank vent system. This way the condensed fumes will roll back into the crankcase. Amazon again!Click image for larger version

Name:	20230920_145132.jpg
Views:	1
Size:	99.4 KB
ID:	3706Click image for larger version

Name:	20230920_145134.jpg
Views:	1
Size:	97.8 KB
ID:	3707Click image for larger version

Name:	20230920_151843.jpg
Views:	1
Size:	98.1 KB
ID:	3708Click image for larger version

Name:	20230920_163726.jpg
Views:	1
Size:	102.2 KB
ID:	3709Click image for larger version

Name:	20230920_163730.jpg
Views:	1
Size:	93.0 KB
ID:	3710
Pntyrmvr is offline   Reply With Quote
Old 09-21-2023, 06:15 PM   #130
Senior Member
 
Pntyrmvr's Avatar
 
Join Date: Mar 2019
Location: GTA
Posts: 154
Default

Motor sat for so long the oil pump lost its prime. Would not produce any oil pressure while I cranked it over. I pulled the fuel pump relay to be sure it wouldn't start dry.

Ended up draining the crankcase out into a modified pressure sprayer. Pulled the pressure sensor out and screwed in a 1/4" hose barb. Added a piece of 1/4" ID clear tubing to the sprayer and pumped it back into the motor. Crank it a few short times while pumping to spread the lube around.

After a few load of oil pumped through the sprayer into the engine I replaced the pressure sensor and hit the starter button. 20 seconds in I had 25 psi.

Next I ran the click clack pump to transfer the 5 gallons of fresh gas to the Nissan tank with the fuel injection pump. It leaked. I put the nylon to hose barb fitting together wrong and it nicked the nylon line into the tank.
Pntyrmvr is offline   Reply With Quote
Old 09-22-2023, 09:36 PM   #131
Senior Member
 
Pntyrmvr's Avatar
 
Join Date: Mar 2019
Location: GTA
Posts: 154
Default

First firing of motor in 18 months. It's a little rough initially, but it is now running smoothly.

Still up on jackstands. Tires turn when it gets put in gear.

Funny overheating issue like an air pocket. More after the weekend.

Cheers!Click image for larger version

Name:	20230921_155905.jpg
Views:	3
Size:	96.3 KB
ID:	3711
Pntyrmvr is offline   Reply With Quote
Old 09-24-2023, 09:08 PM   #132
Senior Member
 
Pntyrmvr's Avatar
 
Join Date: Mar 2019
Location: GTA
Posts: 154
Default

Tuned the cooling fan to kick on at 192° same as the thermostat I put in. Re soldered the old rad inlet I capped off with the sacrificial anode as it was leaking.

Made a funnel from a Gatorade bottle to help bleed the rad of air.

Ran my Bluetooth OBDII dongle and checked temp, voltage, catalytic converters temps, and a other stats. All good. Idle at 625 rpm and rock steady. Hot idle oil pressure is 27 psi.

Tomorrow grease the front end and u joints and take for a short spin. Maybe install the doghouse first.
Pntyrmvr is offline   Reply With Quote
Old 09-25-2023, 08:29 PM   #133
Senior Member
 
Pntyrmvr's Avatar
 
Join Date: Mar 2019
Location: GTA
Posts: 154
Default

Ensuring max fresh air through the rad.

Note bumper holes are offset from center like engine is.

Making ducting to keep forcing the air through the radiator not around it.

The license plate will get lowered to.

There's almost 6 inches of radiator blocked by the bumper and trim with nothing to stop it from avoiding the rad and going around it.Click image for larger version

Name:	20230925_155945.jpg
Views:	2
Size:	101.7 KB
ID:	3712Click image for larger version

Name:	20230925_170605.jpg
Views:	2
Size:	100.4 KB
ID:	3713Click image for larger version

Name:	20230925_170626.jpg
Views:	2
Size:	100.0 KB
ID:	3714
Pntyrmvr is offline   Reply With Quote
Old 09-25-2023, 08:37 PM   #134
Senior Member
 
Pntyrmvr's Avatar
 
Join Date: Mar 2019
Location: GTA
Posts: 154
Default

Here's a short start up video.

https://photos.app.goo.gl/NAK29nFoW2eX1Grr6
Pntyrmvr is offline   Reply With Quote
Old 09-26-2023, 04:44 PM   #135
Senior Member
 
Pntyrmvr's Avatar
 
Join Date: Mar 2019
Location: GTA
Posts: 154
Default

Built sheet metal air dam to force air from grill through the radiator.

Front end back together.

First test drive on the roads. Runs sweet.Click image for larger version

Name:	20230926_132317.jpg
Views:	3
Size:	101.0 KB
ID:	3715Click image for larger version

Name:	20230926_164153.jpg
Views:	3
Size:	103.2 KB
ID:	3716Click image for larger version

Name:	20230926_172405.jpg
Views:	3
Size:	86.6 KB
ID:	3717
Pntyrmvr is offline   Reply With Quote
Old 09-27-2023, 08:35 PM   #136
Senior Member
 
Pntyrmvr's Avatar
 
Join Date: Mar 2019
Location: GTA
Posts: 154
Default

Test drive today with doghouse on.

Wow! Full throttle with 4.10 gears and a tight PATC transmission is a blast. Even at 9000 lbs.

This truck rocks. Perfect exhaust note.

Overdrive working and can't wait to get out on the highway to see the improved mileage.
Pntyrmvr is offline   Reply With Quote
Old 09-29-2023, 06:47 PM   #137
Senior Member
 
Pntyrmvr's Avatar
 
Join Date: Mar 2019
Location: GTA
Posts: 154
Default

Haven't done a long drive yet.

Impressed by instant starting, no gas fumes, quick warm-up, smooth torque curve, plentiful charging amperage, no leaking exhaust, and no stinking exhaust thanks to catalytic converters.

Welcome to 2007 old boy!
Pntyrmvr is offline   Reply With Quote
Old 10-06-2023, 08:35 PM   #138
Senior Member
 
Pntyrmvr's Avatar
 
Join Date: Mar 2019
Location: GTA
Posts: 154
Default

Got the third gear to overdrive hunting issue solved. I bypassed the vacuum switch meant to drop the positive feed to the overdrive solenoid. No more hunting. It'll run to well over the highway speed limit in overdrive with no lugging. I suspect the switch has an intermittent issue.

Can't wait to test the gas mileage on the highway.
Pntyrmvr is offline   Reply With Quote
Old 10-22-2023, 08:51 AM   #139
Senior Member
 
Pntyrmvr's Avatar
 
Join Date: Mar 2019
Location: GTA
Posts: 154
Default

I finally got out on the highway for a 150 mile run at speed. Mostly at speed because the traffic is so bad even on a Saturday afternoon.

Of course strong headwinds had to interrupt a smooth day between traffic jams.

I took the photo just as the Nissan 10.8 gallon tank went dry.

That's 166.8 miles or 15.4 mpg. I don't believe it so I've put exactly 15.9 gallons in the main tank, ran the auxiliary tank dry, and will burn off the 15.9 as a second test.

I may have overfilled the auxiliary tank with the click clack pump so this test will be much more accurate.

The transmission shiftpoints need some tuning as it doesn't downshift without absolutely standing on the loud pedal. No problem as I've still got the vacuum switch sitting right on the doghouse. Click image for larger version

Name:	20231021_173811.jpg
Views:	1
Size:	73.5 KB
ID:	3719
Pntyrmvr is offline   Reply With Quote
Old 10-22-2023, 08:53 AM   #140
Senior Member
 
Pntyrmvr's Avatar
 
Join Date: Mar 2019
Location: GTA
Posts: 154
Default

The truck is a blast to drive. No stinky fumes, no cracked or waped exhaust manifolds, cool floors, and much less engine noise. Gonna have to install my new weatherstripping now.
__________________

Pntyrmvr is offline   Reply With Quote
Reply


Posting Rules
You may not post new threads
You may not post replies
You may not post attachments
You may not edit your posts

BB code is On
Smilies are On
[IMG] code is On
HTML code is Off
Trackbacks are On
Pingbacks are On
Refbacks are On


Powered by vBadvanced CMPS v3.2.3

All times are GMT -5. The time now is 04:25 AM.


Powered by vBulletin® Version 3.8.8 Beta 1
Copyright ©2000 - 2024, vBulletin Solutions, Inc.
×