Journey with Confidence RV GPS App RV Trip Planner RV LIFE Campground Reviews RV Maintenance Take a Speed Test Free 7 Day Trial ×


Join Truck Conversion Today
Reply
 
LinkBack Thread Tools Search this Thread Display Modes
 
Old 06-27-2019, 10:40 AM   #1
Senior Member
 
Pntyrmvr's Avatar
 
Join Date: Mar 2019
Location: GTA
Posts: 151
Default 1979 Dodge MB400 cube van conversion

Hi,

Long time Dodge Sportsmobile 4x4 owner wanting more space and permanent headroom.

Found this one, my 7th Dodge van, on eBay for $2500 in California. 2800 miles from home in Ontario.

7500 original miles. Grandson of original purchaser. Flew out. Drove it home. No issues except a chugging miss on hills. Not fuel pump, coil, or ballast resistor. I'll find it. Reluctor air gap in distributor is next. GVWR is 10,500 lbs. Empty is listed at 5500 lbs. Lots of cargo/interior capacity.

Burns 2 quarts of 10w30 on the way back. Motor fine by me. 8.3 mpg. Needs an air dam for sure. Maybe overdrive too.

440 cu in. 4.10 Dana 70 rear. 14' long box almost 8' wide with 7' headroom.

Prefer solo, remote camping, but also enjoy camping at festivals and races.

Wife is 6' and I'm 6'-4". Combined gross weight of 460 lbs so Sportsmobile upstairs at 42" ide ain't gonna cut it. Cheap foam mattress- no more.

Folding Murphy bed. Queen size. Real mattress.

Already own-

propane frame rail tank
propane chest freezer
propane bar size fridge
RV toilet and tank
RV sink, taps, pump, and tanks
RV 2 burner propane stove
new CO-propane detector
adjustable alternator voltage regulator
12V battery isolator

Bought from AZ RV Salvage in PHX in January-

replacement taillights

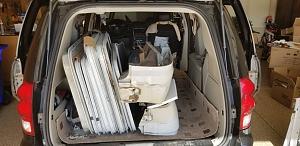
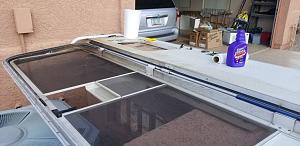
5 white frame tinted windows with screens from an old toy hauler 5th wheel trailer- 1 is emergency egress hinge style unit

full size RV entrance door with screen door from burnt unit- crawled around in it and found the door key!

From other salvage yards-

2 drivers seats from extended cab Dodge pickup. Integral seat belts as cube van has only lap belts and no structure for shoulder belt attachment. Wife wants shoulder belts. Nuff said. 2 drivers seats because I can't buy new seat foam buns for passenger side seats.

Replacement outside rear view mirror.

Jammed it all in a minivan and drove home.

Stored it at the Ranch for the winter and spring never came.

Finally gets here and I pull the doors off.

The box door frame is rotten in places. The rear floor is as well. I cut material out and find very narrow tunnels into the wood frame and sawdust. Lots of melted styrofoam too.Click image for larger version

Name:	20190118_122738.jpeg
Views:	15
Size:	73.4 KB
ID:	2976Click image for larger version

Name:	20190108_141105.jpeg
Views:	16
Size:	36.7 KB
ID:	2977Click image for larger version

Name:	20190113_135402.jpeg
Views:	14
Size:	68.7 KB
ID:	2978[ATTACH]
Attached Thumbnails
20190114_122554.jpeg  
__________________

Pntyrmvr is offline   Reply With Quote
Old 06-27-2019, 10:54 AM   #2
Senior Member
 
Pntyrmvr's Avatar
 
Join Date: Mar 2019
Location: GTA
Posts: 151
Default

More photos...Click image for larger version

Name:	00909_8CnR1Zj6noj_1200x900.jpg
Views:	12
Size:	99.5 KB
ID:	2980Click image for larger version

Name:	00505_lnbWF0oTawt_1200x900.jpg
Views:	11
Size:	102.7 KB
ID:	2981[ATTACH]
Attached Thumbnails
20190108_142010.jpeg  
__________________

Pntyrmvr is offline   Reply With Quote
Old 06-27-2019, 03:08 PM   #3
Senior Member
 
Pntyrmvr's Avatar
 
Join Date: Mar 2019
Location: GTA
Posts: 151
Default

I cannot find the "edit" button on here to remove those two sideways photos.

Any hints?

Edit button shows up under this latest post, but has disappeared from anywhere near the first two. I'm baffled.

I can edit this one through Tapatalk with 28 minutes since I wrote it. I bet that option dies after 30 minutes. Ludicrous.
Pntyrmvr is offline   Reply With Quote
Old 06-27-2019, 10:59 PM   #4
Senior Member
 
Join Date: Feb 2019
Location: void
Posts: 156
Default

Yes, I've noticed that the edit option goes away after a bit. Just popped in your thread to see your latest developments.........
hoodoo valley is offline   Reply With Quote
Old 06-28-2019, 10:08 AM   #5
Senior Member
 
Weldman's Avatar
 
Join Date: Jun 2019
Location: MC
Posts: 119
Default

Glad you are doing this right with the windows and that's how it supposed to be done, good find by the way as it's hard to find windows in a set around here like that. Let me guess A727 trans in that van?
Did the same with my 5th wheel I am building that is currently on hold till I go retrieve it from another state. Don't mind the mobile home trailer frame underneath it in the picture, that's cause I had to move it in emergency cause of some a$$hole ....
Attached Thumbnails
KIMG0092.jpg   KIMG0093.jpg   KIMG0094.jpg   KIMG0095.jpg  
Weldman is offline   Reply With Quote
Old 07-01-2019, 10:31 PM   #6
Senior Member
 
samcrimm's Avatar
 
Join Date: Sep 2015
Location: Tullahoma
Posts: 361
Default

greatr work guys!
__________________
2005 Renegade #1204 42 footer Columbia M3200CH-435,12 speed auto Cat 12 kw Genset, Roadtrip Mission in-mot Dish Network, Washer dryer combo, Jeep Liberty toad,1973 Cessna Skylane,1955 Chev 210 Belair survivor
samcrimm is offline   Reply With Quote
Old 07-15-2019, 01:06 AM   #7
Senior Member
 
Join Date: Feb 2019
Location: void
Posts: 156
Default

Any more updates pntyrmvr?
hoodoo valley is offline   Reply With Quote
Old 07-26-2019, 05:14 PM   #8
Senior Member
 
Pntyrmvr's Avatar
 
Join Date: Mar 2019
Location: GTA
Posts: 151
Default

I'll post some photos tomorrow.

I've got the floors, walls, and rear doors repaired from the carpenter ant damage.

I've also rehung the rear doors so they can't sag once the windows are mounted in them.

Clearance light lenses made from almost unobtanium have arrived. Truck booked for certification on Monday so I'll spend the weekend finishing up a few loose ends.

Happy Friday all.

[emoji598][emoji481][emoji106]
Pntyrmvr is offline   Reply With Quote
Old 07-27-2019, 02:19 AM   #9
Senior Member
 
Join Date: Feb 2019
Location: void
Posts: 156
Default

Right on! Looking forward to the phote's!
hoodoo valley is offline   Reply With Quote
Old 08-04-2019, 12:54 AM   #10
Senior Member
 
Weldman's Avatar
 
Join Date: Jun 2019
Location: MC
Posts: 119
Default

Quote:
Originally Posted by hoodoo valley View Post
Right on! Looking forward to the phote's!
I’m still waiting on these photos too, maybe this give it a bump...
Weldman is offline   Reply With Quote
Old 08-04-2019, 10:57 AM   #11
Senior Member
 
Pntyrmvr's Avatar
 
Join Date: Mar 2019
Location: GTA
Posts: 151
Default Box and door repairs

Hi,

I've had to resize each photo here. I hope you gearheads are worth it...

Someone must have spilled gas in the box of this thing or used some kind of chem to try and kill the carpenter ants. The box is a fiberglass, wood, foam, and plywood sandwich with a layer of aluminum sheet on the steel frames rails in the floor assembly. The foam has melted in a bunch of spots in the rear floor and walls around the doors. Nowhere near the exhaust.

Click image for larger version

Name:	20190407_132502f.jpg
Views:	8
Size:	97.8 KB
ID:	3064

I cut straight edges into the plywood with and oscillating saw to get at the melted foam and cut out the rotten wood.

Click image for larger version

Name:	20190407_155932f.jpg
Views:	6
Size:	86.0 KB
ID:	3065


Click image for larger version

Name:	20190421_163043f.jpg
Views:	7
Size:	88.9 KB
ID:	3066

I had a local tin basher bend up some heavy gauge galvanized sheet steel to replace the paper thin aluminum in the areas I worked on. Lots of caulking in the corners and on top of the frame rails. Three pieces to make the installation easy.

Click image for larger version

Name:	20190518_122721f.jpg
Views:	7
Size:	91.9 KB
ID:	3067

Click image for larger version

Name:	20190518_125530f.jpg
Views:	5
Size:	39.3 KB
ID:	3068
Pntyrmvr is offline   Reply With Quote
Old 08-04-2019, 11:04 AM   #12
Senior Member
 
Pntyrmvr's Avatar
 
Join Date: Mar 2019
Location: GTA
Posts: 151
Default

The next layer is dimensional lumber over 1/8" plywood to spread the wall loads onto the frame rails and kick outs. I used pressure treated wood to help longevity.

Back corner typical repair. I'll jack this up and place it on top of the finished plywood floor.

Click image for larger version

Name:	20190518_155318f.jpg
Views:	3
Size:	78.8 KB
ID:	3070

Lots of PL construction adhesive. And clamps. And pin nails for assembly.

Click image for larger version

Name:	20190519_095237f.jpg
Views:	2
Size:	74.1 KB
ID:	3071

Click image for larger version

Name:	20190519_142736f.jpg
Views:	4
Size:	38.6 KB
ID:	3072

Click image for larger version

Name:	20190519_142741f.jpg
Views:	2
Size:	97.3 KB
ID:	3073
Attached Thumbnails
20190518_125530f.jpg  
Pntyrmvr is offline   Reply With Quote
Old 08-04-2019, 11:13 AM   #13
Senior Member
 
Weldman's Avatar
 
Join Date: Jun 2019
Location: MC
Posts: 119
Default

Thanks for the update looking great though worried about the pin nails and the vibration of the truck pulling them out. Hope the construction adhesive holds well.
At least you got a slab to work on, doing it in a dirt/rock driveway sucks...
Weldman is offline   Reply With Quote
Old 08-04-2019, 11:15 AM   #14
Senior Member
 
Pntyrmvr's Avatar
 
Join Date: Mar 2019
Location: GTA
Posts: 151
Default

Blue 2lb sheet foam between the dimensional lumber.

Click image for larger version

Name:	20190519_143009f.jpg
Views:	3
Size:	93.9 KB
ID:	3074

1/2" plywood over floor and wall patches.

Click image for larger version

Name:	20190519_153208f.jpg
Views:	3
Size:	87.8 KB
ID:	3075

Funnily enough no styrofoam, like in the floors and walls, in the ceiling. Added 1 1/2" of it. 1/8" plywood was shot so in goes 1x12 white pine boards.

Click image for larger version

Name:	20190616_173727f.jpg
Views:	3
Size:	62.2 KB
ID:	3076

Welded up strap extensions to angle steel in the door opening in attempt to avoid sagging doors when the windows are added.

Click image for larger version

Name:	20190705_131756f.jpg
Views:	3
Size:	85.4 KB
ID:	3077

Three ceiling light locations roughed in.

Click image for larger version

Name:	20190706_204449f.jpg
Views:	2
Size:	55.3 KB
ID:	3078
Pntyrmvr is offline   Reply With Quote
Old 08-04-2019, 11:18 AM   #15
Senior Member
 
Pntyrmvr's Avatar
 
Join Date: Mar 2019
Location: GTA
Posts: 151
Default

Long view of cleaned out box. Floor is weathered a bit, but will be hidden with vinyl sheet.

Click image for larger version

Name:	20190727_163307f.jpg
Views:	4
Size:	66.0 KB
ID:	3079

Galvanized sheet bent edge protection. Couldn't resist the large roofing nails for that old boot look.

Click image for larger version

Name:	20190727_163344f.jpg
Views:	4
Size:	76.8 KB
ID:	3080
Pntyrmvr is offline   Reply With Quote
Old 08-04-2019, 11:24 AM   #16
Senior Member
 
Pntyrmvr's Avatar
 
Join Date: Mar 2019
Location: GTA
Posts: 151
Default

Pins were strictly for hold parts together while the construction adhesive set up. I've used it to glue frozen lumber together. It will hold!

I forgot to mention I installed bolts through the floor into the frame rails. Hard to see in the photos.
Pntyrmvr is offline   Reply With Quote
Old 08-04-2019, 11:39 AM   #17
Senior Member
 
Pntyrmvr's Avatar
 
Join Date: Mar 2019
Location: GTA
Posts: 151
Default Plans

I have done much space planning on this box starting with doodling on photos.

Click image for larger version

Name:	20190119_155115f.jpg
Views:	1
Size:	69.0 KB
ID:	3081

Click image for larger version

Name:	20190119_155128f.jpg
Views:	1
Size:	65.8 KB
ID:	3082

Click image for larger version

Name:	20190119_155259f.jpg
Views:	1
Size:	57.5 KB
ID:	3083
Pntyrmvr is offline   Reply With Quote
Old 08-04-2019, 11:40 AM   #18
Senior Member
 
Pntyrmvr's Avatar
 
Join Date: Mar 2019
Location: GTA
Posts: 151
Default

This set of doodles is to try and effectively place the wrecking yard windows and door from AZ.

Click image for larger version

Name:	20190108_141046f.jpg
Views:	2
Size:	50.1 KB
ID:	3084

Click image for larger version

Name:	20190114_134829f.jpg
Views:	3
Size:	54.0 KB
ID:	3085

Click image for larger version

Name:	20190108_141854f.jpg
Views:	2
Size:	76.8 KB
ID:	3086
Pntyrmvr is offline   Reply With Quote
Old 08-04-2019, 12:04 PM   #19
Senior Member
 
Pntyrmvr's Avatar
 
Join Date: Mar 2019
Location: GTA
Posts: 151
Default

Side elevations and a floor plan.

A queen size bed folds up at the back onto the road side wall. From there a table swings down with the bench running along the back doors to be an eating area. Bed swings up on its long side. Bench center section is removable to allow van to be used as a van.

Forward on the curb side is the screened entrance door. Forward of that is a propane freezer set at counter height with a propane fridge wall mounted above it.

Road side forward of the bed is a counter with lockable steel filing cabinets below.

Back side of cab/front box wall is cut out to allow driving seats to move back. Presently passenger seat has to be removed to get engine dog house out. Too tight for tall people.

Click image for larger version

Name:	20190307_201840f.jpg
Views:	5
Size:	95.6 KB
ID:	3093

Click image for larger version

Name:	20190307_202012f.jpg
Views:	5
Size:	34.6 KB
ID:	3094

Click image for larger version

Name:	20190307_201754f.jpg
Views:	5
Size:	44.4 KB
ID:	3095

Click image for larger version

Name:	20190307_201459f.jpg
Views:	5
Size:	93.3 KB
ID:	3096

Click image for larger version

Name:	20190307_201920f.jpg
Views:	4
Size:	89.3 KB
ID:	3097
Pntyrmvr is offline   Reply With Quote
Old 08-04-2019, 11:40 PM   #20
Senior Member
 
Join Date: Feb 2019
Location: void
Posts: 156
Default

Daaaaang! You been busy! Looking fabulous!
__________________

hoodoo valley is offline   Reply With Quote
Reply

Thread Tools Search this Thread
Search this Thread:

Advanced Search
Display Modes

Posting Rules
You may not post new threads
You may not post replies
You may not post attachments
You may not edit your posts

BB code is On
Smilies are On
[IMG] code is On
HTML code is Off
Trackbacks are On
Pingbacks are On
Refbacks are On


Powered by vBadvanced CMPS v3.2.3

All times are GMT -5. The time now is 09:06 PM.


Powered by vBulletin® Version 3.8.8 Beta 1
Copyright ©2000 - 2024, vBulletin Solutions, Inc.
×