Journey with Confidence RV GPS App RV Trip Planner RV LIFE Campground Reviews RV Maintenance Take a Speed Test Free 7 Day Trial ×


Join Truck Conversion Today
Reply
 
LinkBack Thread Tools Search this Thread Display Modes
 
Old 08-05-2019, 09:11 PM   #21
Senior Member
 
samcrimm's Avatar
 
Join Date: Sep 2015
Location: Tullahoma
Posts: 361
Default

looking great love the pictures!
__________________

__________________
2005 Renegade #1204 42 footer Columbia M3200CH-435,12 speed auto Cat 12 kw Genset, Roadtrip Mission in-mot Dish Network, Washer dryer combo, Jeep Liberty toad,1973 Cessna Skylane,1955 Chev 210 Belair survivor
samcrimm is offline   Reply With Quote
Old 08-06-2019, 01:00 AM   #22
Senior Member
 
Weldman's Avatar
 
Join Date: Jun 2019
Location: MC
Posts: 119
Default

You should look to using Google Sketchup very nice program the free trial version works enough for builds like ours.
__________________

Weldman is offline   Reply With Quote
Old 04-04-2020, 10:19 AM   #23
Senior Member
 
Pntyrmvr's Avatar
 
Join Date: Mar 2019
Location: GTA
Posts: 152
Default

I've suddenly had a lot a free time on my hands.

Apparently someone drank too much Corona and now the world has a hangover.

Warm weather means I can comfortably work outside. Who buys a 40 year old van that won't fit in his garage?

I started at the back with the bed, table, and bench combination.

The wood is 5/4 white pine. I buy it kiln dried in 12" widths.

The bench across the back has a 51" removable center section so that we can use the "Cubicle" as a truck if needed.Click image for larger version

Name:	20200326_170818~2.jpeg
Views:	5
Size:	64.1 KB
ID:	3248
Pntyrmvr is offline   Reply With Quote
Old 04-04-2020, 10:25 AM   #24
Senior Member
 
Pntyrmvr's Avatar
 
Join Date: Mar 2019
Location: GTA
Posts: 152
Default

The bench also serves as seating for the fold down table that stows beneath the fold down queen bed.Click image for larger version

Name:	20200402_142426~2.jpeg
Views:	4
Size:	58.9 KB
ID:	3249Click image for larger version

Name:	20200402_142251.jpeg
Views:	4
Size:	55.1 KB
ID:	3250
Pntyrmvr is offline   Reply With Quote
Old 04-04-2020, 10:38 AM   #25
Senior Member
 
Pntyrmvr's Avatar
 
Join Date: Mar 2019
Location: GTA
Posts: 152
Default

I priced out a 60" base cabinet for the cooking area.

Not happening! Besides the particle board construction wouldn't hold up to road vibes for long.

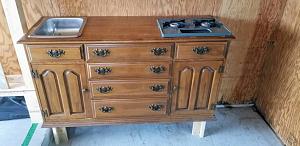
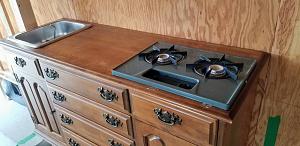
I picked up a $60, used buffet and hutch. Solid wood. The lower buffet section has central drawers, not doors so we can stow cookware easily. I'll build some kind of pin to link the drawers together and hold them closed during travel.

The end sections will house fresh water jugs and a grey water receiver.

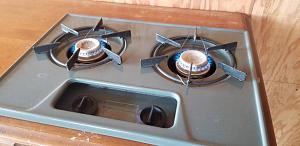
I pulled a two burner cooktop and a sink from a 1982 Sportsmobile.

Cleaned them up. Wire wheel and spray paint for the cooktop. Photo shows a test fit. I'll put a faucet and a laminate countertop with an integral back splash once the world returns to normal. The left end upper drawer is now pinned in place. The right end one is cut down to half height. The center upper drawer lost 3 inches in width. The whole cabinet is set on block legs to prop it up to an acceptable counter height. The legs allow storage beneath for our dining shelter.

Click image for larger version

Name:	20200403_161123~2.jpeg
Views:	3
Size:	66.6 KB
ID:	3251Click image for larger version

Name:	20200403_161108~2.jpeg
Views:	3
Size:	67.4 KB
ID:	3252Click image for larger version

Name:	20200403_161115.jpeg
Views:	3
Size:	50.9 KB
ID:	3253
Pntyrmvr is offline   Reply With Quote
Old 04-04-2020, 12:06 PM   #26
Senior Member
 
Weldman's Avatar
 
Join Date: Jun 2019
Location: MC
Posts: 119
Default

Some N50 magnets will hold them closed.
Weldman is offline   Reply With Quote
Old 04-04-2020, 08:43 PM   #27
Senior Member
 
Pntyrmvr's Avatar
 
Join Date: Mar 2019
Location: GTA
Posts: 152
Default

I like that magnet idea.

Up front I finished removing the remaining wall between the cab and the box.

Now we can get seats installed that recline and slide far enough back for good legroom.Click image for larger version

Name:	20200404_125942.jpeg
Views:	4
Size:	69.4 KB
ID:	3254Click image for larger version

Name:	20200404_133747~2.jpeg
Views:	4
Size:	73.6 KB
ID:	3255
Pntyrmvr is offline   Reply With Quote
Old 04-04-2020, 08:51 PM   #28
Senior Member
 
Pntyrmvr's Avatar
 
Join Date: Mar 2019
Location: GTA
Posts: 152
Default

Rot repairs resumed. The front driver's side corner of the box this time. Bad design from day one.

The passenger side will likely need the same routine.

Luckily I still have enough material left over from earlier rot fixes that I don't have to go out for more bits and pieces.

Plus side is I'm getting better at not slicing through critical areas with the oscillating saw. And better at rot detection. I cut just past the last rusty fastener and that's where the rot usually ends.Click image for larger version

Name:	20200404_155157~2.jpeg
Views:	4
Size:	68.3 KB
ID:	3256Click image for larger version

Name:	20200404_165156~2.jpeg
Views:	4
Size:	81.4 KB
ID:	3257Click image for larger version

Name:	20200404_172327~2.jpeg
Views:	4
Size:	60.1 KB
ID:	3258
Pntyrmvr is offline   Reply With Quote
Old 04-06-2020, 08:10 AM   #29
Senior Member
 
Pntyrmvr's Avatar
 
Join Date: Mar 2019
Location: GTA
Posts: 152
Default

Might as well weld in the mount for the propane tank now while it's easy to get at.

That's as tucked up as it'll go while still being accessible for filling.

Hangs as low as the bottom of the muffler. We'll see.

The other optional position was forward of the rear bumper between the frame rails. That would impact the departure angle too much so it goes back of the cab under the front of the box.

Click image for larger version

Name:	20200405_163828~3.jpeg
Views:	3
Size:	70.9 KB
ID:	3259Click image for larger version

Name:	20200405_163804~2.jpeg
Views:	3
Size:	33.1 KB
ID:	3260
Pntyrmvr is offline   Reply With Quote
Old 04-06-2020, 10:25 PM   #30
Senior Member
 
Pntyrmvr's Avatar
 
Join Date: Mar 2019
Location: GTA
Posts: 152
Default

Trying to get materials to finish the rot repairs is getting tough.

Local lumber yard fully closed. Home Depot only taking online orders for pickup. None of their fasteners can be ordered online.

I have an order in for pickup tomorrow, but have no confirmation that it will actually happen.

Bought more beer today. Not much else left to do.
Pntyrmvr is offline   Reply With Quote
Old 04-08-2020, 04:07 PM   #31
Senior Member
 
Pntyrmvr's Avatar
 
Join Date: Mar 2019
Location: GTA
Posts: 152
Default

Local lumber yard back open. Home Depot still has not sent email saying pickup is ready. So local yard got the gig.

Picked up material late afternoon. In the mean time put in another window.

It's an egress window. You flip the red latches and the window hinges at the top to allow escape from any zombies who have made it inside the van.

Or your wife's cooking.Click image for larger version

Name:	20200408_133109~2.jpeg
Views:	4
Size:	60.4 KB
ID:	3261Click image for larger version

Name:	20200408_162035.jpeg
Views:	4
Size:	48.5 KB
ID:	3262Click image for larger version

Name:	20200408_165938.jpeg
Views:	4
Size:	49.3 KB
ID:	3263
Pntyrmvr is offline   Reply With Quote
Old 04-09-2020, 06:43 PM   #32
Senior Member
 
Pntyrmvr's Avatar
 
Join Date: Mar 2019
Location: GTA
Posts: 152
Default

Got down to rot repair at the front of the box on the driver's side.


Click image for larger version

Name:	20200409_131157~2.jpeg
Views:	3
Size:	81.2 KB
ID:	3264Click image for larger version

Name:	20200409_144704~2.jpeg
Views:	4
Size:	61.9 KB
ID:	3265Click image for larger version

Name:	20200409_152331~2.jpeg
Views:	3
Size:	58.4 KB
ID:	3266Click image for larger version

Name:	20200409_165916~2.jpeg
Views:	3
Size:	58.4 KB
ID:	3267
Pntyrmvr is offline   Reply With Quote
Old 04-09-2020, 06:52 PM   #33
Senior Member
 
Pntyrmvr's Avatar
 
Join Date: Mar 2019
Location: GTA
Posts: 152
Default

Floor repair done same as rear areas.

Galvanized sheet metal on top of frame outriggers and rails, 1/8" plywood, 2x framing as needed, 1 1/2" foam between framing, and 1/2" plywood on top.

Lots of quality caulking below and plenty of construction adhesive within.

I used pressure treat lumber wherever I could. You never know when the rot or carpenter ants return.
Pntyrmvr is offline   Reply With Quote
Old 04-09-2020, 07:50 PM   #34
Senior Member
 
Weldman's Avatar
 
Join Date: Jun 2019
Location: MC
Posts: 119
Default

Quote:
Originally Posted by Pntyrmvr View Post
Floor repair done same as rear areas.

Galvanized sheet metal on top of frame outriggers and rails, 1/8" plywood, 2x framing as needed, 1 1/2" foam between framing, and 1/2" plywood on top.

Lots of quality caulking below and plenty of construction adhesive within.

I used pressure treat lumber wherever I could. You never know when the rot or carpenter ants return.
Yeah never know when outside invaders want to come knocking though you are knocking on adding extra weight more than usual to the rig so I would be careful. Nothing can stop wood from rotting when you don't know you have a leak and that usually what causes all the destruction.
Weldman is offline   Reply With Quote
Old 04-10-2020, 06:52 PM   #35
Senior Member
 
Pntyrmvr's Avatar
 
Join Date: Mar 2019
Location: GTA
Posts: 152
Default

Too right. The upside for PT is nothing compared to years of rot and pest freedom.

So the passenger or curbside corner floor and lower wall are rotten as is the 2x2 that supports the box floor at the cab transition. Click image for larger version

Name:	20200410_113917.jpeg
Views:	3
Size:	66.0 KB
ID:	3268Click image for larger version

Name:	20200410_114435.jpeg
Views:	3
Size:	61.6 KB
ID:	3269Click image for larger version

Name:	20200410_154745.jpeg
Views:	3
Size:	68.1 KB
ID:	3270Click image for larger version

Name:	20200410_154806.jpeg
Views:	4
Size:	58.3 KB
ID:	3271Click image for larger version

Name:	20200410_154800~2.jpeg
Views:	4
Size:	72.0 KB
ID:	3272
Pntyrmvr is offline   Reply With Quote
Old 04-10-2020, 06:53 PM   #36
Senior Member
 
Pntyrmvr's Avatar
 
Join Date: Mar 2019
Location: GTA
Posts: 152
Default

More tomorrow as I work at less than 50°F.
Pntyrmvr is offline   Reply With Quote
Old 04-11-2020, 12:07 AM   #37
Senior Member
 
Weldman's Avatar
 
Join Date: Jun 2019
Location: MC
Posts: 119
Default

Quote:
Originally Posted by Pntyrmvr View Post
More tomorrow as I work at less than 50°F.
Less than 50°F hehe, been tweaking on mine and its been getting down to 0°F just haven't posted any pictures lately of wiring. You must be in a warm climate area that's not usually below 60°F.

Just take your time a Buddy heater helps and it will come together. Surprised you didn't erase the slate and started it over with all new rebuild.
Weldman is offline   Reply With Quote
Old 04-11-2020, 07:58 AM   #38
Senior Member
 
Pntyrmvr's Avatar
 
Join Date: Mar 2019
Location: GTA
Posts: 152
Default

Southern Ontario is not my idea of tropical right now! I'm warm enough as long as I don't have a section of floor out. The wind here is crazy.

I'm too cheap to start from scratch and I'm enjoying the challenge of repairing the box without completely gutting it.

Yesterday I finally pulled the last rotten bits out of the box. The connection at the cab was FUBAR from the day this truck was built 41 years ago.

Night photo shows how thin the skin is.

Last photo is at cab/box joint where I'll replace the rotten 2x2 that runs across the front of the floor under the plywood.Click image for larger version

Name:	20200410_205349.jpeg
Views:	6
Size:	29.8 KB
ID:	3273Click image for larger version

Name:	20200410_113917~2.jpeg
Views:	6
Size:	85.4 KB
ID:	3274Click image for larger version

Name:	20200410_114435~2.jpeg
Views:	6
Size:	85.2 KB
ID:	3275Click image for larger version

Name:	20200410_154745.jpeg
Views:	6
Size:	68.1 KB
ID:	3276Click image for larger version

Name:	20200410_154800~2.jpeg
Views:	6
Size:	79.6 KB
ID:	3277
Pntyrmvr is offline   Reply With Quote
Old 04-13-2020, 10:50 PM   #39
Senior Member
 
Pntyrmvr's Avatar
 
Join Date: Mar 2019
Location: GTA
Posts: 152
Default

I finally cut the last rotten wood out of Cubicle yesterday.

Today I put in all new steel pan and wood. Lots of caulking and construction adhesive.

Done.

Now on to a million other items. First to get this thing cleared out of all the old, rotten bits.

Oh, Home Depot finally emailed my order for $200 of bits and pieces is ready. 7 days after I made it. Promise was 3 days max. Click image for larger version

Name:	20200411_175253.jpeg
Views:	5
Size:	58.6 KB
ID:	3278Click image for larger version

Name:	20200413_141128.jpeg
Views:	6
Size:	73.9 KB
ID:	3279Click image for larger version

Name:	20200413_151326.jpeg
Views:	6
Size:	71.2 KB
ID:	3280Click image for larger version

Name:	20200413_161901.jpeg
Views:	6
Size:	48.1 KB
ID:	3281Click image for larger version

Name:	20200413_163144.jpeg
Views:	6
Size:	43.6 KB
ID:	3282
Pntyrmvr is offline   Reply With Quote
Old 04-19-2020, 08:57 AM   #40
Senior Member
 
Pntyrmvr's Avatar
 
Join Date: Mar 2019
Location: GTA
Posts: 152
Default

Next step the propane tank was mounted. Lowest point higher than the muffler.


Click image for larger version

Name:	20200418_142904.jpeg
Views:	6
Size:	43.5 KB
ID:	3283
__________________

Pntyrmvr is offline   Reply With Quote
Reply

Thread Tools Search this Thread
Search this Thread:

Advanced Search
Display Modes

Posting Rules
You may not post new threads
You may not post replies
You may not post attachments
You may not edit your posts

BB code is On
Smilies are On
[IMG] code is On
HTML code is Off
Trackbacks are On
Pingbacks are On
Refbacks are On


Powered by vBadvanced CMPS v3.2.3

All times are GMT -5. The time now is 10:28 AM.


Powered by vBulletin® Version 3.8.8 Beta 1
Copyright ©2000 - 2024, vBulletin Solutions, Inc.
×