 |
|
 05-26-2020, 08:33 PM
|
#61
|
|
Senior Member
Join Date: Mar 2019
Location: GTA
Posts: 154
|
Dropped the roof frame the last inch or so into place onto a thick layer of caulking. Started installing the perimeter screws. I'm using galvanized metal roof screws with the washer and gasket. Each screw hole gets a small dab of caulking before the screw is driven home. I don't want moisture under the frame.
The frame was a tight fit. I had to climb along the roof and jump on the frame to get it bottomed.
I installed a drip edge under the back angle to help steer rain water from the roof away from the rear doors. 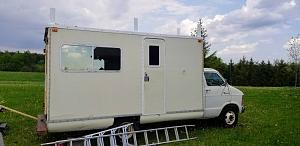
__________________
|

|

|
|
05-29-2020, 03:18 PM
|
#62
|
|
Senior Member
Join Date: Mar 2019
Location: GTA
Posts: 154
|

Thunder storms preclude outdoor work so time for a little ciphering with the club cab seats.
The Cubicle came with only lap belts and no headrests so an upgrade was needed. The 98 to 02 Dodge club cabs came with integral seat belts. Important because with no steel roof beam continuing back of the cab the traditional factory van shoulder belt mount doesn't exist. Also 3 more inches of travel means leg room galore for taller people. As well full recline and a spare bench to nap across if needed. The center console flips down for an armrest and up for a middle seat.
Of course the van floor is almost perfectly smooth while the club cab floor had all sorts of lumps and bumps that the seat mounts had to accommodate. A few minutes with a digital angle finder and the dimensions are set. I've got the seat slope at 14°. The '14 Caravan slope is 14° and is fine for long seat times.
The passenger seat mount is 1" shorter in length than the driver's which limits leg room already crowded by the big block's wider doghouse. I'll mount it and the center seat/console back the inch so the front edge of the seats match at the most rearward position for the seats. I hope that gives me enough room to pull the doghouse out. The factory setup meant yanking the passenger seat to remove it. I've never had a van with a bench seat so, like every new idea, you have to keep learning. 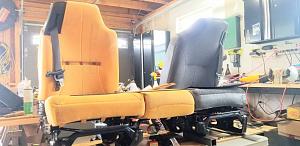 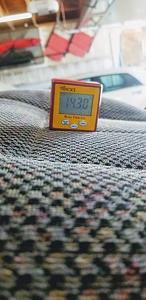
__________________
|
|
|
|
|
05-29-2020, 03:46 PM
|
#63
|
|
Senior Member
Join Date: Mar 2019
Location: GTA
Posts: 154
|
I have a spare driver's seat base so mocking up the install is painless.
The white studs are the factory pieces. The newer seat uses a much wider footing so I'll weld a 3/16" strap over the new base in line with the original holes and bolt it down. The mounts are much longer so I'll add 2 more bolts through the floor towards the back.
The passenger side factory bolts are much further back so I'll do the same welded strap overlay but add 2 new bolts through the floor towards the front. 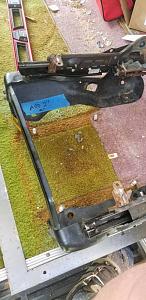
|
|
|
|
|
05-31-2020, 07:55 AM
|
#64
|
|
Senior Member
Join Date: Mar 2019
Location: GTA
Posts: 154
|
Cut the hole for access to the interior of the air dam. 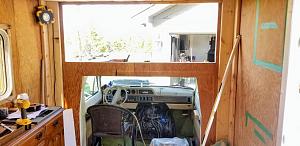
|
|
|
|
|
06-01-2020, 09:12 AM
|
#65
|
|
Senior Member
Join Date: Mar 2019
Location: GTA
Posts: 154
|
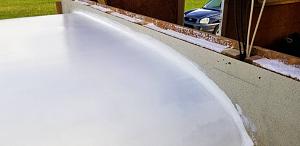
Painted the roof and caulked the cab to box joint that will be impossible to get at in the future. Lifted the air dam up, solo, caulked the joint for it to the box and screwed it down.
Prewired the circuit for the clearance lights. Same style as before, to match, just new units.
Next step is to line air dam with plywood and then add the aluminum exterior skin.
|
|
|
|
|
06-02-2020, 08:11 AM
|
#66
|
|
Senior Member
Join Date: Mar 2019
Location: GTA
Posts: 154
|
Stretched the air dam clearance light wiring to get it out of the way. Started the plywood lining of the air dam interior. Lots of space for storage.
Test fitted the aluminum cap for the air dam. Rain coming. Of course. 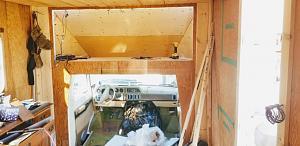 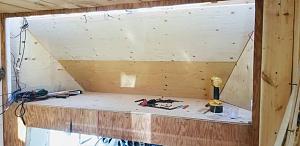 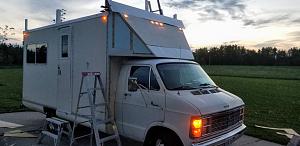
|
|
|
|
|
06-02-2020, 05:44 PM
|
#67
|
|
Senior Member
Join Date: Mar 2019
Location: GTA
Posts: 154
|
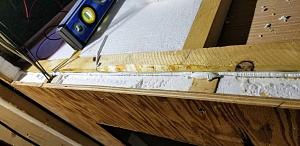
Started the aluminum skin over the air dam. A friend bent the pieces up. I'm reusing the margin trim from the upper wall perimeter. The rest of the box has it so I'm adding to the air dam for consistency. It's an extrusion with holes every 4 inches. I'm dry fitting it all together and will add mastic and/or caulking on final assembly. Nothing worse than slimy, caulking all over everything while you try and hold it all still and drive a screw home. Metal roofing screws with a rubber gasket as per everywhere else on the exterior.
Taped in place first, then cut the margin trims to size. Drill through the skin into the wood frame and drive home a zillion metal roof screws. 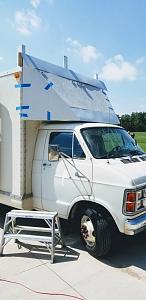 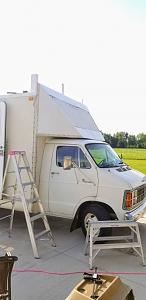
|
|
|
|
|
06-02-2020, 08:58 PM
|
#68
|
|
Senior Member
Join Date: Mar 2019
Location: GTA
Posts: 154
|
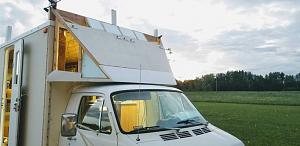
Starting to look like the original vision I had in mind for it. 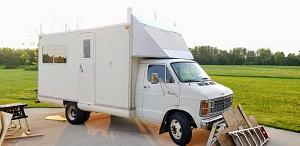
|
|
|
|
|
06-03-2020, 04:55 PM
|
#69
|
|
Senior Member
Join Date: Mar 2019
Location: GTA
Posts: 154
|
Temporarily installed aluminum cap at the top of the air dam blew off and crumpled in a storm last night so its going to need some love.
Sketched out the remaining aluminum pieces I need and await my buddy's return from the north hinterland to do his metal brake magic.
Did get the lower front seam between the reused original glass skin and the aluminum tip of the air dam sorted out with another piece of reused margin trim.
Once the are all sorted out to size and dry installed I'll paint them. The rust Mark's at each screw hole looks like crap. Eventually all the screws on the truck will be metal roof gasket style screws. I've had to order some hard to find sized screws for the air dam to make up for a couple of design, ahem, miscues...
Great outdoor weather so I'll keep chipping away. 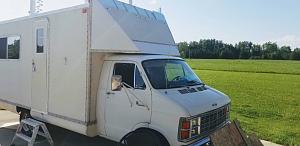
|
|
|
|
|
06-03-2020, 07:37 PM
|
#70
|
|
Senior Member
Join Date: Mar 2019
Location: GTA
Posts: 154
|
Here's the crumpled end. This stuff is light. 
|
|
|
|
|
06-08-2020, 09:10 PM
|
#71
|
|
Senior Member
Join Date: Mar 2019
Location: GTA
Posts: 154
|
Gave up trying to adapt the 98-02 club cab seat mounts to the 79 floor and bolt pattern. Too many changes in elevation versus the flat floor of the van.
Unbolted the seat mounts from the tracks. Added a 4" steel strap to raise the needed height to a 3x3 angle. Cut out a bit of clearance for the track and presto a flat seat mount.
I have a plywood template of the floor with the factory seat mount studs drilled out. I can work inside instead of humping the seats or new mounts back and forth so they should drop in place.  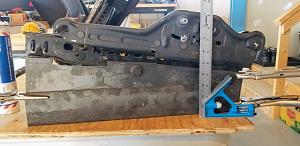
|
|
|
|
|
06-08-2020, 09:12 PM
|
#72
|
|
Senior Member
Join Date: Mar 2019
Location: GTA
Posts: 154
|
I've already burned through a pound roll of welding wire on the roof frame, and propane tank and seat mounts. At least my welding is improving faster than my grinding skills.
|
|
|
|
|
06-09-2020, 04:58 PM
|
#73
|
|
Senior Member
Join Date: Mar 2019
Location: GTA
Posts: 154
|
Hot day today. Grinder heating up very quickly.
Welded both sides of the driver's seat mount. Worked out the angles and dimensions needed to reuse the center console brackets. Cut them down and came up with a plan.
Checked the vertical height of the lower pivot bolts for the vertical section of the seat. These have to be in the same planes or the seat will bind. Within 0.125" over the width of the seat. Dodge should be so lucky...
Tomorrow more of the same.
Cheers. 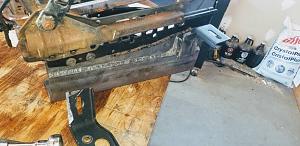
|
|
|
|
|
06-12-2020, 09:35 PM
|
#74
|
|
Senior Member
Join Date: Mar 2019
Location: GTA
Posts: 154
|
Passenger seat base almost welded up. Ran out of welding wire. Again... 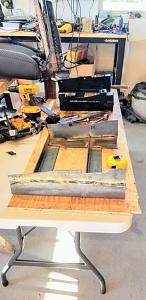 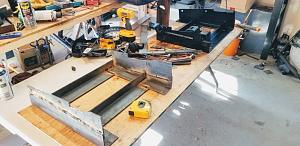
|
|
|
|
|
06-15-2020, 06:12 AM
|
#75
|
|
Senior Member
Join Date: Mar 2019
Location: GTA
Posts: 154
|
A touch out of focus, but here are the bases in their final positions with the dog house installed. Hope for enough clearance with the seats installed to allow the dog house to come away without unbolting a seat. 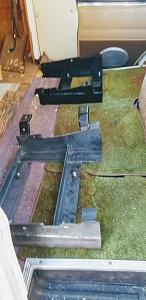
|
|
|
|
|
06-18-2020, 02:41 PM
|
#76
|
|
Senior Member
Join Date: Mar 2019
Location: GTA
Posts: 154
|
A constant blue sky, hot, and little breeze.
What better weather to climb on a metal roof, balance on a narrow board, line up flimsy aluminium bits, and screw the whole mess together?
Aluminum parts from my buddy showed up last week. I got stuck on the seat bases. They're painted and ready to be installed. So the air dam skin was next.
In hind sight I would have bought a sheet or 2 of fiberglass and used that. Aluminum just sort of fell into my lap.
I painted 2 of the horizontal margin trims that cross the front of the air dam. The color change and clean look really make a visual difference from the old, ratty original trims. I still have to pull it apart and seal all the joints so I'll paint the other 6 trims on the air dam at that point.
New clearance lights, an exact match of the 41 year old originals round out the look. 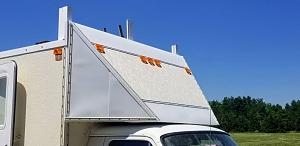
|
|
|
|
|
06-20-2020, 02:27 PM
|
#77
|
|
Senior Member
Join Date: Mar 2019
Location: GTA
Posts: 154
|
Cleared out tools, and scrap from the box. Ran the vacuum around to pick up the dust.
Added a top piece of plywood to the wall inside the air dam. Installed some wall loops and an old cargo net from a minivan. No idea how we'll use this space, but the net will keep crap from bouncing around.
Oil and filter change. Synthetic 10W30. Motor holds almost 6 quarts.
Found pesky transmission leak on top of the cooler return line. It sprung a leak after I changed the starter in January. I popped the lines off the retainer clip. About a 1/4" movement and presto a leak started 10" further aft. It took a lot of parts cleaner spray, but finally showed up on the top side of the line. I consider this a factory defect. Too little motion to actually crack a sound line. 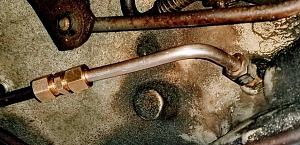 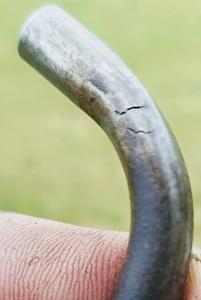
|
|
|
|
|
06-22-2020, 12:52 AM
|
#78
|
|
Senior Member
Join Date: Jun 2019
Location: MC
Posts: 119
|
Love the work and ambition to improve and not play the victim or a pity party cause you have never done something. You dived deep in and got your hands dirty, experimented and learned from your mistakes. Not many I say that to.
P.S. put down the caulking tube and grab some 5200 for those galvanized screws and everything else that needs sealed. A tube of it will last awhile and what you don't use screw the nozzle off clean it out, wrap some foil around the opening on the tube, screw nozzle back on put in gallon size plastic bag and put into freezer till next use. Just pull it out hours before to defrost.
|
|
|
|
|
06-22-2020, 08:29 AM
|
#79
|
|
Senior Member
Join Date: Mar 2019
Location: GTA
Posts: 154
|
3M 5200 marine adhesive sealant sounds like a good choice as it cures to a rubbery consistency.
I used Dap 3.0 window, trim, and siding caulking. It's a caulking with silicone added so it will stick to previous layers unlike pure silicone. White or clear. The clear gathers dust and looks like crap after it cures. Both are rubbery when cured.
Interesting comment from Weldman on trying new repairs. I've done all of the tasks before, just never in some of the combinations required on this project. Such is the adventure that keeps me going. Some new aspect to figure out each day. The challenge. I enjoy the challenge even on days where I have to back track or yell at my hands for misbehaving.
Onward!
|
|
|
|
|
06-22-2020, 11:33 AM
|
#80
|
|
Senior Member
Join Date: Jun 2019
Location: MC
Posts: 119
|
Thing with 5200 vs Dap 3.0 is 5200 will take more harsher environments and extremes and it acts as adhesive too not just a sealant. Seemed way you put in your words that this was first time thing to do such as the welding part is what I was gathering off of, though carry on.
__________________
|
|
|
|
|
|
 Posting Rules
|
You may not post new threads
You may not post replies
You may not post attachments
You may not edit your posts
HTML code is Off
|
|
|
|
 » Recent Threads
 |
|
|
|
|
|
|
|
|
|
|
|
|
|
|
|
|
|
|
|
|
|
|
|
|
|


 Linear Mode


