Journey with Confidence RV GPS App RV Trip Planner RV LIFE Campground Reviews RV Maintenance Take a Speed Test Free 7 Day Trial ×


Join Truck Conversion Today
Reply
 
LinkBack Thread Tools Search this Thread Display Modes
 
Old 04-19-2020, 09:07 AM   #41
Senior Member
 
Pntyrmvr's Avatar
 
Join Date: Mar 2019
Location: GTA
Posts: 154
Default

Followed by fixing the front, lower corners of the box where the original design allowed water to infiltrate and eventually rot the interior corners I just repaired.

I scribed the curve of the lower box valence on to pressure treated lumber sure to outlast the original plywood pieces.

Sheet metal lapped to push any moisture away from the wood with enough caulking to seal a ship. Then metal roofing screws with rubber washers to hold it all together.

Should keep it all free of rot. I'll clean up the excess caulking once it sets. Still too cold around here.Click image for larger version

Name:	20200418_114510.jpeg
Views:	6
Size:	33.4 KB
ID:	3284Click image for larger version

Name:	20200418_142926.jpg
Views:	6
Size:	96.0 KB
ID:	3285Click image for larger version

Name:	20200418_155650.jpeg
Views:	6
Size:	67.5 KB
ID:	3286Click image for larger version

Name:	20200418_165253.jpeg
Views:	6
Size:	70.8 KB
ID:	3287
__________________

Pntyrmvr is offline   Reply With Quote
Old 04-20-2020, 07:12 PM   #42
Senior Member
 
Pntyrmvr's Avatar
 
Join Date: Mar 2019
Location: GTA
Posts: 154
Default

And the driver's side.

Done. No more rotten bits.

Next stop front of box, over cab air dam.Click image for larger version

Name:	20200420_141304.jpeg
Views:	5
Size:	62.1 KB
ID:	3288
__________________

Pntyrmvr is offline   Reply With Quote
Old 04-26-2020, 06:42 AM   #43
Senior Member
 
Pntyrmvr's Avatar
 
Join Date: Mar 2019
Location: GTA
Posts: 154
Default

Upgrading the seats from 41 year old to 21 year old.

Bought bench with console combo 3rd seat for $100 including built in seat belts as the van only came with lap belts and we'd prefer shoulder style.

Sold the old pair for $300 so that's a bonus.

Took a million measurements to replicate the fit. Will likely have the seats lower as we're tall.Click image for larger version

Name:	20200424_133123.jpeg
Views:	4
Size:	72.8 KB
ID:	3289Click image for larger version

Name:	20200424_115644.jpeg
Views:	4
Size:	73.1 KB
ID:	3290
Pntyrmvr is offline   Reply With Quote
Old 04-26-2020, 06:48 AM   #44
Senior Member
 
Pntyrmvr's Avatar
 
Join Date: Mar 2019
Location: GTA
Posts: 154
Default

Seats covers are stripped down and run through the wash twice. Works well.

Warm weather let me work on the air dam for the front of the box.

Used up some scrap foam for the sandwich style design.

A few test pieces for the rafters. The air dam will project 8 inches above the box for a future project.Click image for larger version

Name:	20200425_125506.jpeg
Views:	3
Size:	78.3 KB
ID:	3291Click image for larger version

Name:	20200425_153900.jpeg
Views:	3
Size:	72.4 KB
ID:	3292Click image for larger version

Name:	20200425_155929.jpeg
Views:	3
Size:	59.7 KB
ID:	3293
Pntyrmvr is offline   Reply With Quote
Old 04-27-2020, 06:38 AM   #45
Senior Member
 
Pntyrmvr's Avatar
 
Join Date: Mar 2019
Location: GTA
Posts: 154
Default

Here I've got the air dam mocked up against a sheet of plywood to mimic the front wall of the box.Click image for larger version

Name:	20200426_160152.jpeg
Views:	3
Size:	67.3 KB
ID:	3294
Pntyrmvr is offline   Reply With Quote
Old 04-28-2020, 07:58 AM   #46
Senior Member
 
Pntyrmvr's Avatar
 
Join Date: Mar 2019
Location: GTA
Posts: 154
Default

Finalized all the measurements and got the 2x8 that will ride across the perimeter of the roof attached to the ribs.

A buddy came by to review the dam. He has an aluminum brake and will bend up the bottom and side panels along with the corner strips.

I'm trying to keep the weight down so the interior 1/2" plywood will be installed after the air dam is mounted. Essentially only the bare minimum frame will have to get dragged up the roof for mounting.

Sure would be nice to own some scaffolding...Click image for larger version

Name:	20200427_172456.jpeg
Views:	3
Size:	68.6 KB
ID:	3295Click image for larger version

Name:	20200427_172505.jpeg
Views:	3
Size:	64.5 KB
ID:	3296
Pntyrmvr is offline   Reply With Quote
Old 04-28-2020, 11:26 AM   #47
Senior Member
 
Pntyrmvr's Avatar
 
Join Date: Mar 2019
Location: GTA
Posts: 154
Default

Filled in the rest of the ribs with insulation.Click image for larger version

Name:	20200428_114056.jpeg
Views:	4
Size:	66.3 KB
ID:	3297Click image for larger version

Name:	20200428_114111.jpeg
Views:	4
Size:	61.4 KB
ID:	3298
Pntyrmvr is offline   Reply With Quote
Old 04-28-2020, 07:48 PM   #48
Senior Member
 
Pntyrmvr's Avatar
 
Join Date: Mar 2019
Location: GTA
Posts: 154
Default

Cut the fiberglass reinforced panel (FRP) from the front of the box. This strip will become the center part of the angled air dam surface.

The glue must have let go years ago. It just fell off once the perimeter was cut.

Then it was trimmed to fit the air dam.

I put the air dam in the garage as we expect 1/2" rain over the next two day. I covered the front wall of the box with some scrap OSB.

I'll glue the FRP on tomorrow. Then we'll add aluminum above and below as well as on the sides.

The flashing details are still rattling around in my head. Some things just have be be dealt with as they happen during installation.

Click image for larger version

Name:	20200428_140700.jpeg
Views:	5
Size:	70.0 KB
ID:	3299Click image for larger version

Name:	20200428_145322.jpeg
Views:	5
Size:	63.8 KB
ID:	3300Click image for larger version

Name:	20200428_151131.jpeg
Views:	5
Size:	53.7 KB
ID:	3301
Pntyrmvr is offline   Reply With Quote
Old 04-28-2020, 07:50 PM   #49
Senior Member
 
Pntyrmvr's Avatar
 
Join Date: Mar 2019
Location: GTA
Posts: 154
Default

Hint on removing 41 year old failed contact cement from plastic panels. Use a cup style twisted wire wheel on an angle grinder. Works well without chemicals or scrubbing.
Pntyrmvr is offline   Reply With Quote
Old 04-30-2020, 03:55 PM   #50
Senior Member
 
Pntyrmvr's Avatar
 
Join Date: Mar 2019
Location: GTA
Posts: 154
Default

Glued the old fiberglass panel to the air dam. The remaining areas will be aluminum.

Welded the first corner of the roof deck support angle steel together. Dragged it up to get an idea of final measurements for the entire frame.

I'll finish welding it up, scrape the rust off, pre-drill the holes, paint it, and then line the inside with blue skin membrane. That will keep the water away from the roof to angle steel contact area. I'll lay a bead of caulking on the roof before dropping it into final position.Click image for larger version

Name:	20200430_110910.jpeg
Views:	7
Size:	60.5 KB
ID:	3302Click image for larger version

Name:	20200430_164445.jpeg
Views:	7
Size:	52.3 KB
ID:	3303Click image for larger version

Name:	20200430_164516.jpeg
Views:	7
Size:	44.3 KB
ID:	3304
Pntyrmvr is offline   Reply With Quote
Old 05-03-2020, 08:41 PM   #51
Senior Member
 
Pntyrmvr's Avatar
 
Join Date: Mar 2019
Location: GTA
Posts: 154
Default

Pulled, actually let fall, the angle off the roof. Broke a clearance light in the fall.

Nonetheless I continue!

Finished welding the frame together.

Then layed out the uprights for the folding rail posts.

Got 2 put together and sanded down then welded them in place.

Quick coat of spray can paint to cover the raw metal and my day is over. A long day.Click image for larger version

Name:	20200503_210141.jpeg
Views:	6
Size:	63.8 KB
ID:	3310Click image for larger version

Name:	20200503_205631.jpeg
Views:	6
Size:	48.7 KB
ID:	3311Click image for larger version

Name:	20200503_205615.jpeg
Views:	6
Size:	43.3 KB
ID:	3312
Pntyrmvr is offline   Reply With Quote
Old 05-05-2020, 05:40 PM   #52
Senior Member
 
Pntyrmvr's Avatar
 
Join Date: Mar 2019
Location: GTA
Posts: 154
Default

A coat of paint to stop rusting after cleaning off the red stuff.

Aluminum on the bottom of the air dam. Contact cement is not my friend. Caulked the folded joint and beat it flat with a hammer and block of wood. Made sure it points backwards so as to not gather rain as the 'Cubicle' rolls on down the highway.

Jammed up on supplies again. Can only get curbside service from Home Depot. Waiting for paint and welding wire. Been 4 days...Click image for larger version

Name:	20200504_194421.jpg
Views:	6
Size:	95.9 KB
ID:	3313Click image for larger version

Name:	20200505_163803.jpeg
Views:	6
Size:	58.2 KB
ID:	3314
Pntyrmvr is offline   Reply With Quote
Old 05-13-2020, 09:29 PM   #53
Senior Member
 
Pntyrmvr's Avatar
 
Join Date: Mar 2019
Location: GTA
Posts: 154
Default

Finally got welding wire to continue with the uprights on the roof frame.

Decided that the intersection of the roof frame and air dam is too critical to weld up and then verify at final assembly so the half skinned air dam was hoisted up and fastened to the box. I lifted it up by myself. Fun.

The scrap angle steel fits perfectly and will work fine with the roof uprights as planned.

Click image for larger version

Name:	20200513_181926.jpg
Views:	6
Size:	93.6 KB
ID:	3320Click image for larger version

Name:	20200513_181908.jpeg
Views:	6
Size:	67.1 KB
ID:	3321Click image for larger version

Name:	20200513_182000.jpeg
Views:	6
Size:	52.5 KB
ID:	3322Click image for larger version

Name:	20200513_182027.jpeg
Views:	6
Size:	62.1 KB
ID:	3323Click image for larger version

Name:	20200513_182237.jpeg
Views:	6
Size:	34.8 KB
ID:	3324Click image for larger version

Name:	20200513_183255.jpeg
Views:	5
Size:	64.9 KB
ID:	3325
Pntyrmvr is offline   Reply With Quote
Old 05-13-2020, 09:37 PM   #54
Senior Member
 
Pntyrmvr's Avatar
 
Join Date: Mar 2019
Location: GTA
Posts: 154
Default

Next steps are to finish the uprights, clean the roof frame, and paint it. The inside of the frame will be lined with Blueskin to keep air and water off the metal.

Then the frame goes up and is attached to the top of the box walls.

The air dam will be skinned and then permanently installed against the box. The connection to the box will be skinned as well; in aluminum.

From there the roof gets a surprise addition.
Pntyrmvr is offline   Reply With Quote
Old 05-17-2020, 07:55 PM   #55
Senior Member
 
Pntyrmvr's Avatar
 
Join Date: Mar 2019
Location: GTA
Posts: 154
Default

Rain due so no more painting or sanding.

Swung to the back end to work on the rear door seals. Factory setup was 1/8" metal strips extending across the door gaps with foam weather stripping to block the dust and weather.

Ripped red cedar fence boards in half to cover the gaps. Routed the back out to make room for the steel hinge straps.

Caulking and paint will clean them up.

Right door will overlap the left.

Drop bolts will hold the doors shut from the inside. The existing cargo cams, levers, shaft, and cups weighed in at 30 lbs. That weight is gone and will add life to the right things.
Click image for larger version

Name:	20200517_145613.jpg
Views:	6
Size:	96.2 KB
ID:	3328Click image for larger version

Name:	20200517_145706.jpeg
Views:	6
Size:	69.5 KB
ID:	3329
Pntyrmvr is offline   Reply With Quote
Old 05-17-2020, 08:10 PM   #56
Senior Member
 
Pntyrmvr's Avatar
 
Join Date: Mar 2019
Location: GTA
Posts: 154
Default

Keen eyes will note the final window is installed in the rear, passenger side door.

The interior is much brighter now. Even with the bug screens installed. Click image for larger version

Name:	20200508_160056.jpeg
Views:	5
Size:	76.8 KB
ID:	3330
Pntyrmvr is offline   Reply With Quote
Old 05-20-2020, 09:01 PM   #57
Senior Member
 
Pntyrmvr's Avatar
 
Join Date: Mar 2019
Location: GTA
Posts: 154
Default

Have to clean up the roof issues that will become inaccessible after the air dam is mounted.

I used a torch to melt the caulking in roof edge gutters. Scraped the burnt bits out and then ran a narrow drill powered wire wheel through them to clear out the rust.Click image for larger version

Name:	20200520_100939.jpeg
Views:	3
Size:	41.0 KB
ID:	3331
Pntyrmvr is offline   Reply With Quote
Old 05-22-2020, 05:06 PM   #58
Senior Member
 
Pntyrmvr's Avatar
 
Join Date: Mar 2019
Location: GTA
Posts: 154
Default

Followed up wire wheel with a spray can application of rust converter. Let that set up for a day and then a first coat of rust paint called recreation white. Suspiciously like the factory color of the Cubicle, but the roof will be invisible once the air dam is up.

The bottom of the roof frame has had 3 coats of paint after cleaning off any rust. The uprights are welded in place. The holes are drilled to line up with the roof joists as it were. Two more coats topside, flip it over, cover the inside surface with Blueskin, and toss it on the roof.

Then install the air dam.

So simple.Click image for larger version

Name:	20200522_145041.jpeg
Views:	3
Size:	45.9 KB
ID:	3332Click image for larger version

Name:	20200522_175854.jpeg
Views:	3
Size:	98.8 KB
ID:	3333
Pntyrmvr is offline   Reply With Quote
Old 05-24-2020, 10:53 PM   #59
Senior Member
 
Pntyrmvr's Avatar
 
Join Date: Mar 2019
Location: GTA
Posts: 154
Default

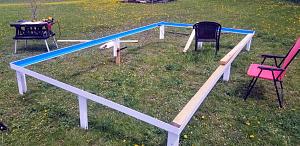
Leggz and I lined the inside of the roof frame with Blueskin to keep the painted surface from moisture exposure.

This stuff is used to make wall and roof penetrations water tight. It is ridiculously sticky and a pain to apply in long runs or in our case, into the inside corner of a 3 inch steel angle.

We eventually decided to install it 9 inches at a time rather than in long runs. We could work separately and 9 inch pieces were much more manageable.

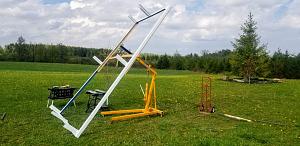
My Mom had suggested I use "that big yellow thing" to hoist the frame up to the van's roof. I told her my engine hoist it wouldn't go high enough for the job. A little noodling on her idea lead to the next photo. One end of the frame can clear the van roof using the hoist. Time will tell if I can use it to raise the other end too.

The van wouldn't start to move it in for an attempt. The see through fuel filters appear to be falling apart internally and clogging the gas flow.

Tomorrow is another day. Thankfully.
Click image for larger version

Name:	20200524_142549.jpg
Views:	3
Size:	94.6 KB
ID:	3334Click image for larger version

Name:	20200524_161823.jpeg
Views:	3
Size:	84.5 KB
ID:	3335
Pntyrmvr is offline   Reply With Quote
Old 05-25-2020, 03:35 PM   #60
Senior Member
 
Pntyrmvr's Avatar
 
Join Date: Mar 2019
Location: GTA
Posts: 154
Default

Hottest day so far this year...

Used the engine hoist to get the balance of the roof frame over the back of the roof.

Pushed, prodded, and finessed it along the roof until it met the front edge. Pried it over the edge with a couple of hammers. I put blocks under it to prop it high enough for a huge bead of caulking underneath it tomorrow. Then I'll drop it down right on the roof.

Straightforward and relatively simple installation. Not easy but I did it solo in 4 hours. Amazing part is how unstraight 14 feet of 3 inch angle steel actually is. I had to put a spreader at 7 feet to push it out to the required width.

Click image for larger version

Name:	20200525_120953.jpeg
Views:	3
Size:	82.6 KB
ID:	3340Click image for larger version

Name:	20200525_142428.jpeg
Views:	3
Size:	84.8 KB
ID:	3341Click image for larger version

Name:	20200525_143406.jpeg
Views:	3
Size:	83.9 KB
ID:	3342Click image for larger version

Name:	20200525_160609.jpeg
Views:	3
Size:	76.4 KB
ID:	3343
__________________

Pntyrmvr is offline   Reply With Quote
Reply

Thread Tools Search this Thread
Search this Thread:

Advanced Search
Display Modes

Posting Rules
You may not post new threads
You may not post replies
You may not post attachments
You may not edit your posts

BB code is On
Smilies are On
[IMG] code is On
HTML code is Off
Trackbacks are On
Pingbacks are On
Refbacks are On


Powered by vBadvanced CMPS v3.2.3

All times are GMT -5. The time now is 02:01 AM.


Powered by vBulletin® Version 3.8.8 Beta 1
Copyright ©2000 - 2024, vBulletin Solutions, Inc.
×