 |
|
 01-19-2016, 01:42 PM
|
#21
|
|
Senior Member
Join Date: Jul 2011
Location: Tomball
Posts: 1,414
|
if a propane/electric fridge can't maintain colder than 40* imo theres something wrong w/ the fridge - even in texas/arizona (110*+) weather we've never had a problem.
the manufactures are moving to residential fridges as a mean to reduce cost & increase margin (having a few well publicized fires probably hasn't hurt either).
Face it MOST RV'er don't dry-camp anyway, its the racers who dry camp...and racers have largely purchased conversion trucks.
The more serious dry-campers want to use as little 120vac as possible.
In 5 years time I've consumed less than 15 gallons of propane. I guess I've topped the propane tank up THREE times (mostly cause i didn't have a feel for what i would consume)....none of those times has been difficult (at my local tractor supply store, 2x & once at a Flying J. even towing).
__________________
__________________
Don R.
'04 Haulmark (M42386) 42', 2 slide, 10kw - Pictures
'04 F350 CrewCab Longbed 4x4, 50g aux tank & gear vendors dbl over
|

|

|
|
01-19-2016, 03:40 PM
|
#22
|
|
Senior Member
Join Date: Jan 2011
Posts: 527
|

One difference I've noted from one camper to the next is the way they vent the refrigerator. The correct way to do it is a roof vent so that you get a chimney flue effect drawing plenty of air over the coils and making the fridge more efficient. You see some folks that use a second side door higher up on the wall for the upper vent and imo there no way that would get a free flow of air through the space. Those doors are constructed to allow air to flow freely in and up, and air would would not flow freely down and out through those same holes as the rising air would have to hit the top of the space, then work its way back down to the door holes. I am assuming they do it that way for expense or convenience or the desire to have one less roof opening. When I did a rv fridge install from scratch in my race trailer through the roof I never had a problem staying plenty cold and everything frozen no matter how hot it got outside, and that was with no air conditioning on inside when it sat in the driveway. I'm curious if any of you that had issues staying cold had the sidewall style vent vs. the roof vent?
__________________
|
|
|
|
|
01-28-2016, 06:40 PM
|
#23
|
|
Senior Member
Join Date: Feb 2009
Location: St. Paul, MN
Posts: 1,819
|
Mine is vented out the roof. I never had problems keeping food cold in hot camping. I'm switching for the various pros listed above. My biggest is that I'm worried about the ammonia leaking and catching fire. I am a little worried about how long I'll be able to run it on my two house batteries and inverter. If run time is not acceptable I'll probable see if I can fit a couple 6v golf cart batteries along the frame somewhere underneath there.
__________________
'03 Freightliner FL112, 295" wheel base, with '03 United Specialties 26' living quarters, single screw, Cat C12 430 h/p 1650 torque, Eaton 10speed , 3.42 rear axle ratio
|
|
|
|
|
02-13-2016, 02:28 PM
|
#24
|
|
Senior Member
Join Date: Feb 2009
Location: St. Paul, MN
Posts: 1,819
|
Got a fair amount of work done. Used 2" pink foam board insulation to block off the roof and wall venting. I sealed it down with a bead of silicone sealant. The plywood that the fridge sits on was only held up by a piece of 1x across the front and back. I decided that wasn't probably as strong as I want. So I cut some 2x6 and 2x4 (used what scrap I had around) and glued those to the side walls underneath (running vertically) and then ran some sheet rock screws down through the plywood into the ends of the 2x's. I think they will be under compression so not worried about them falling out of place. I had to trim back the side and top wood to allow the ever so slightly larger fridge fit in. I also wanted to allow as much air to circulate in there. I'm possibly going to cut some holes in the base plywood back near the back to allow air to circulate through. I'll see how tight the fridge is first. Other option is to put a vent in the side wall near the lower end of the cabinet.
Let's see if I can get the photos to work here:
Roof vent closed off:

__________________
'03 Freightliner FL112, 295" wheel base, with '03 United Specialties 26' living quarters, single screw, Cat C12 430 h/p 1650 torque, Eaton 10speed , 3.42 rear axle ratio
|
|
|
|
|
02-13-2016, 02:29 PM
|
#25
|
|
Senior Member
Join Date: Feb 2009
Location: St. Paul, MN
Posts: 1,819
|
Good, they're working.
Rear vent blocked off:

__________________
'03 Freightliner FL112, 295" wheel base, with '03 United Specialties 26' living quarters, single screw, Cat C12 430 h/p 1650 torque, Eaton 10speed , 3.42 rear axle ratio
|
|
|
|
|
02-13-2016, 02:32 PM
|
#26
|
|
Senior Member
Join Date: Feb 2009
Location: St. Paul, MN
Posts: 1,819
|
This shows the 1x that the plywood base rests on.

__________________
'03 Freightliner FL112, 295" wheel base, with '03 United Specialties 26' living quarters, single screw, Cat C12 430 h/p 1650 torque, Eaton 10speed , 3.42 rear axle ratio
|
|
|
|
|
02-13-2016, 02:33 PM
|
#27
|
|
Senior Member
Join Date: Feb 2009
Location: St. Paul, MN
Posts: 1,819
|
Couple 2x's in place.

__________________
'03 Freightliner FL112, 295" wheel base, with '03 United Specialties 26' living quarters, single screw, Cat C12 430 h/p 1650 torque, Eaton 10speed , 3.42 rear axle ratio
|
|
|
|
|
02-13-2016, 02:38 PM
|
#28
|
|
Senior Member
Join Date: Feb 2009
Location: St. Paul, MN
Posts: 1,819
|
Here's where the inverter is going to go. Next to the bed. My electrical panel is mounted in the foot end of the bed. The house batteries are in a compartment directly under this. I think it shouldn't be a huge deal to run the 4 gauge wire down there. I'm probably going to use flexible non-metallic weather tight conduit. Similar to what they use to connect your house a/c unit to the disconnect on the side of your house. I've got a spool of that on the shelf.
Ooops, looks like something spilled in that cabinet. I better clean that up before MrsBob86ZZ4 spots it.

__________________
'03 Freightliner FL112, 295" wheel base, with '03 United Specialties 26' living quarters, single screw, Cat C12 430 h/p 1650 torque, Eaton 10speed , 3.42 rear axle ratio
|
|
|
|
|
02-13-2016, 02:40 PM
|
#29
|
|
Senior Member
Join Date: Feb 2009
Location: St. Paul, MN
Posts: 1,819
|
My electrical panel is mounted in the foot of the bed so it should work well to wire over from this cabinet into the bed platform and run down to the panel. I'll try to remember to take pictures while doing that.
__________________
'03 Freightliner FL112, 295" wheel base, with '03 United Specialties 26' living quarters, single screw, Cat C12 430 h/p 1650 torque, Eaton 10speed , 3.42 rear axle ratio
|
|
|
|
|
02-13-2016, 08:21 PM
|
#30
|
|
Senior Member
Join Date: Oct 2014
Location: Where my trailer is sitting!
Posts: 251
|
Strange.... I see no pictures 
__________________
For now 1996 Dodge Ram 5.9 Cummins 365HP 830TQ pulling a 2006 28' Dutchmen Fifthwheel and at times a 16' boat behind that!
|
|
|
|
|
02-13-2016, 10:08 PM
|
#31
|
|
Senior Member
Join Date: Feb 2009
Location: St. Paul, MN
Posts: 1,819
|
Really? I see them. Hhhmmmm. Might be set to private or something. I'll try to figure it out.
|
|
|
|
|
02-13-2016, 11:53 PM
|
#32
|
|
Senior Member
Join Date: Jul 2011
Location: Tomball
Posts: 1,414
|
same here bob...no pictures
__________________
Don R.
'04 Haulmark (M42386) 42', 2 slide, 10kw - Pictures
'04 F350 CrewCab Longbed 4x4, 50g aux tank & gear vendors dbl over
|
|
|
|
|
02-14-2016, 10:42 AM
|
#33
|
|
Senior Member
Join Date: Sep 2015
Location: Tullahoma
Posts: 361
|
Do you have an electric/propane water heater? did come that way or did you add the electric part?
Sam
Quote:
Originally Posted by bushpilot

if a propane/electric fridge can't maintain colder than 40* imo theres something wrong w/ the fridge - even in texas/arizona (110*+) weather we've never had a problem.
the manufactures are moving to residential fridges as a mean to reduce cost & increase margin (having a few well publicized fires probably hasn't hurt either).
Face it MOST RV'er don't dry-camp anyway, its the racers who dry camp...and racers have largely purchased conversion trucks.
The more serious dry-campers want to use as little 120vac as possible.
In 5 years time I've consumed less than 15 gallons of propane. I guess I've topped the propane tank up THREE times (mostly cause i didn't have a feel for what i would consume)....none of those times has been difficult (at my local tractor supply store, 2x & once at a Flying J. even towing).
|
__________________
2005 Renegade #1204 42 footer Columbia M3200CH-435,12 speed auto Cat 12 kw Genset, Roadtrip Mission in-mot Dish Network, Washer dryer combo, Jeep Liberty toad,1973 Cessna Skylane,1955 Chev 210 Belair survivor
|
|
|
|
|
02-14-2016, 10:46 AM
|
#34
|
|
Senior Member
Join Date: Sep 2015
Location: Tullahoma
Posts: 361
|
I see your pictures bob.
__________________
2005 Renegade #1204 42 footer Columbia M3200CH-435,12 speed auto Cat 12 kw Genset, Roadtrip Mission in-mot Dish Network, Washer dryer combo, Jeep Liberty toad,1973 Cessna Skylane,1955 Chev 210 Belair survivor
|
|
|
|
|
02-14-2016, 12:52 PM
|
#35
|
|
Senior Member
Join Date: Feb 2009
Location: St. Paul, MN
Posts: 1,819
|
How come Sam can see my pictures and Don and Tom can't?
Sam, my water heater is 120 volt or propane. I have two switches on the wall so I can decide how I want to turn it on. Came that way. Same for the water heater in my Allegro I had before this one.
Don and Tom, can you see this picture:

__________________
'03 Freightliner FL112, 295" wheel base, with '03 United Specialties 26' living quarters, single screw, Cat C12 430 h/p 1650 torque, Eaton 10speed , 3.42 rear axle ratio
|
|
|
|
|
02-14-2016, 06:26 PM
|
#36
|
|
Senior Member
Join Date: Mar 2015
Location: Cincinnati
Posts: 146
|
I can see the last picture you posted, but none of the prior.
I just got mostly done with my Norcold 1200 to Samsung RF18 conversion this weekend while the weather was nice here. I need to take a picture, but basically I removed the old Norcold which consisted of disconnect the gas and water lines, disconnect two 120v plugs, and remove all the mounting screws in front under the trim piece, and two screws at the back. I removed the doors from the Norcold and the internal shelves. Then just slid it out and then out of the MH.
The conversion for the new bigger size Samsung required a significant amount of cabinet work to lower the mounting floor and increase the opening size. On my MH there were two drawers approx 8 inches high below the frig, and then two smaller cabinet spaces above the frig around 5 inches height. The difficulty is those bottom drawers are short length, as heating ducts and some water lines run behind the drawers and under the frig. So I could not just eliminate the drawers, I still needed to have space for those ducts and lines. In addition, there are the two vent pipes going up the wall for the grey and black tanks, and they sort of 45 deg degree at the height of the old frig floor. So between the ducts and the tank vent pipes, I could not go all the way to the floor. I ended up figuring out I could use the pieces of wood that made up the top cabinets, with cut down height drawers, so I now have two drawers approx 5 inches height that use the doors from the cabinets. This gave me minimum height for the ducts and lines, and using some creative notching of the plywood base for the vent pipes, I could make the new floor about 3 inches lower than it was before. Eliminating the upper cabinets was no real loss, and i was able to reuse the piece going across that previously was the piece that was on top of the lower drawers. That piece just sits flush now at the top of the opening. In the end, I gained the height needed for the Samsung, still kept the lower drawers. I sealed the top vent opening with some styrofoam form the new frig packing, and glued in place with silicone caulk. Still need to make a permanent seal for the MH side lower opening. I did have to make a bit longer plywood floor so the rollers and mount brackets for the Samsung would sit right. Still need to paint that piece and maybe cut it back some to be more stylish. It is bare plywood now.
I removed the doors from the Samsung and was able to get it through my side door without too much problem. The lift into the opening and once adjusted into position, I used the factory front leveling feet brackets to mount it solid to my base. The factory brackets have feet, but I just drilled holes through the plywood and put bolts up through, sandwiching a 1 inch spacer. New frig is not going to come out, although I should maybe add a top bracket, just for insurance.
I still need to do the wiring, and the inverter mounting. Just happy it is all in place now and I was able to do it without major wood work, reusing those cabinets door fronts with the shorter drawers has it almost looking like it was designed that way.
I will try to get some pics, I was too busy doing the work and forgot to take pictures during the process.
__________________
2005 Kenworth Showhauler 45 ft total length
twin screw, 450 hp ISX, 10 speed Ultrashift
|
|
|
|
|
02-14-2016, 08:06 PM
|
#37
|
|
Senior Member
Join Date: Oct 2014
Location: Where my trailer is sitting!
Posts: 251
|
Yep, I can see the last picture, but not the others. It don't make sense to me.
__________________
For now 1996 Dodge Ram 5.9 Cummins 365HP 830TQ pulling a 2006 28' Dutchmen Fifthwheel and at times a 16' boat behind that!
|
|
|
|
|
02-15-2016, 10:37 PM
|
#38
|
|
Senior Member
Join Date: Mar 2015
Location: Cincinnati
Posts: 146
|
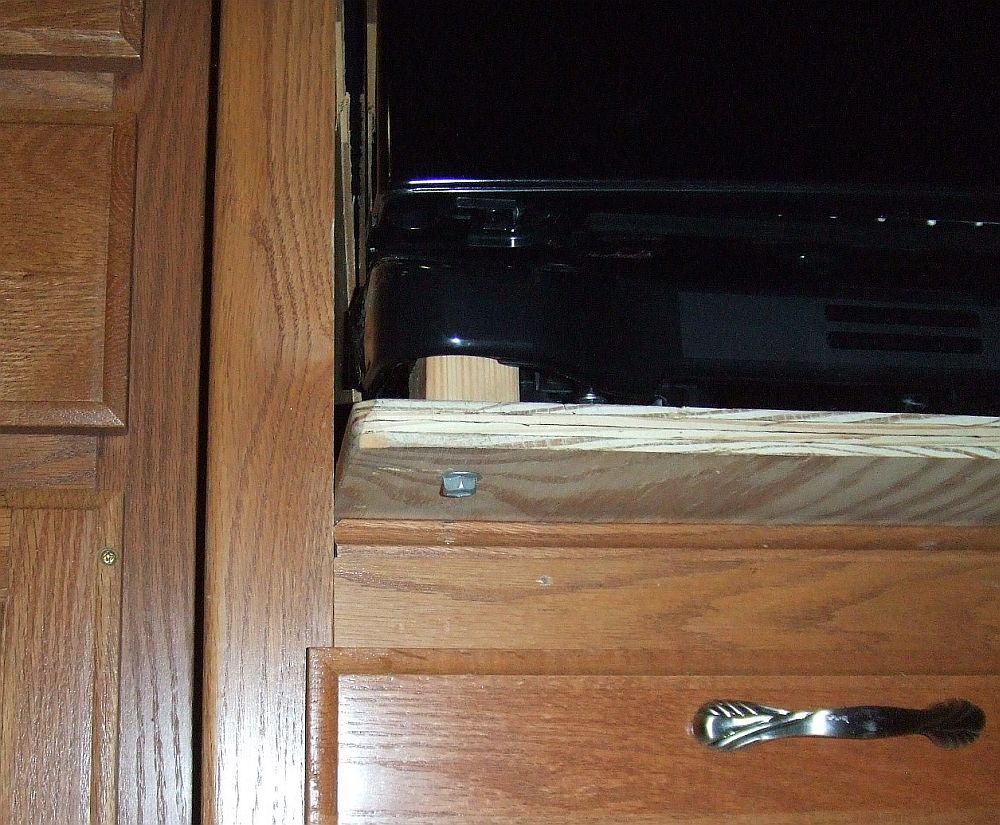
Got some poor pictures, but to show the changes. Still in-process, need to trim back the plywood so it does not stick out as much, probably will contour it for more style. Until the frig was in place, too hard to know exactly, now I can cut it back to fit and be less obtrusive. Also considering to paint it black so it blends in vs painting clear which would not match the oak. Although the orig picture does not show the top cabinets that no longer exist, the close-up you can see the doors that are now the shorter drawer fronts.
Old Norcold 1200 frig:
New Samsung RF18 frig
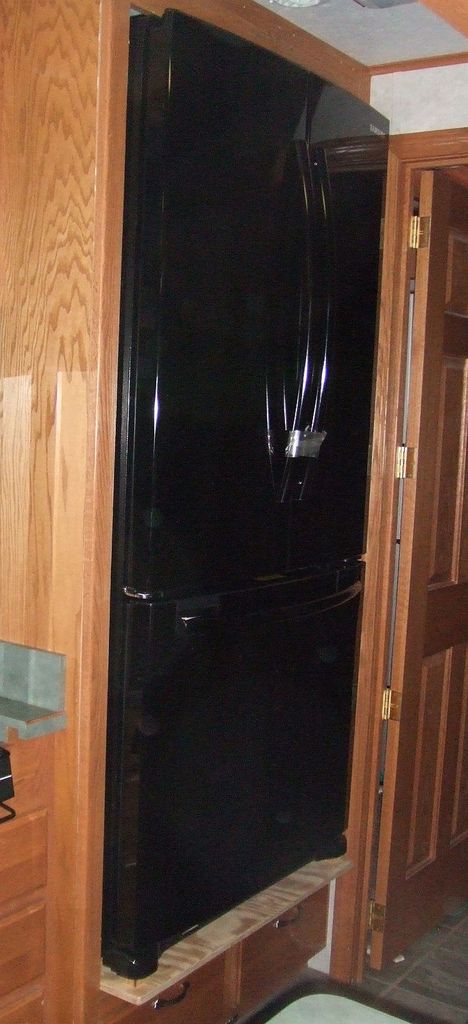
Close-up of the front mounts:
__________________
2005 Kenworth Showhauler 45 ft total length
twin screw, 450 hp ISX, 10 speed Ultrashift
|
|
|
|
|
02-16-2016, 02:33 PM
|
#39
|
|
Senior Member
Join Date: Feb 2009
Location: St. Paul, MN
Posts: 1,819
|
Thanks for the info on your conversion 38Chev! I like your idea of removing the front levelers and bolting through the plywood into the fridge there. That was one thing I hadn't worked out yet. I know I don't want to secure it from the back bottom because I've sealed off that vent so now don't have easy access back there. I had thought about somehow making the foam removable but rules that out. Your idea sounds like it might work for me. I haven't gotten the fridge up into place yet to see how that will work. I'm also think about removing the rear rollers since I'm not too concerned about scratching the plywood while putting it in place. I'm thinking I'll use the top door hinge bolts to attach a bracket to and then attach to the wood when I slide it in. Top and bottom securing sounds like the great idea to me. Did you do anything about venting the cabinet into the room? Allowing air behind the fridge? I think I'll have about 1/2" clearance all the way around mine. Not sure if that is enough?
__________________
'03 Freightliner FL112, 295" wheel base, with '03 United Specialties 26' living quarters, single screw, Cat C12 430 h/p 1650 torque, Eaton 10speed , 3.42 rear axle ratio
|
|
|
|
|
02-16-2016, 02:40 PM
|
#40
|
|
Senior Member
Join Date: Feb 2009
Location: St. Paul, MN
Posts: 1,819
|
Found out I can't edit my posts to fix the picture problem. Apparently we have 120 minutes to edit a post and then it gets locked. So, I made a new album in my picasa and made sure to set it so everybody can view them (I think). Let's see if this works.
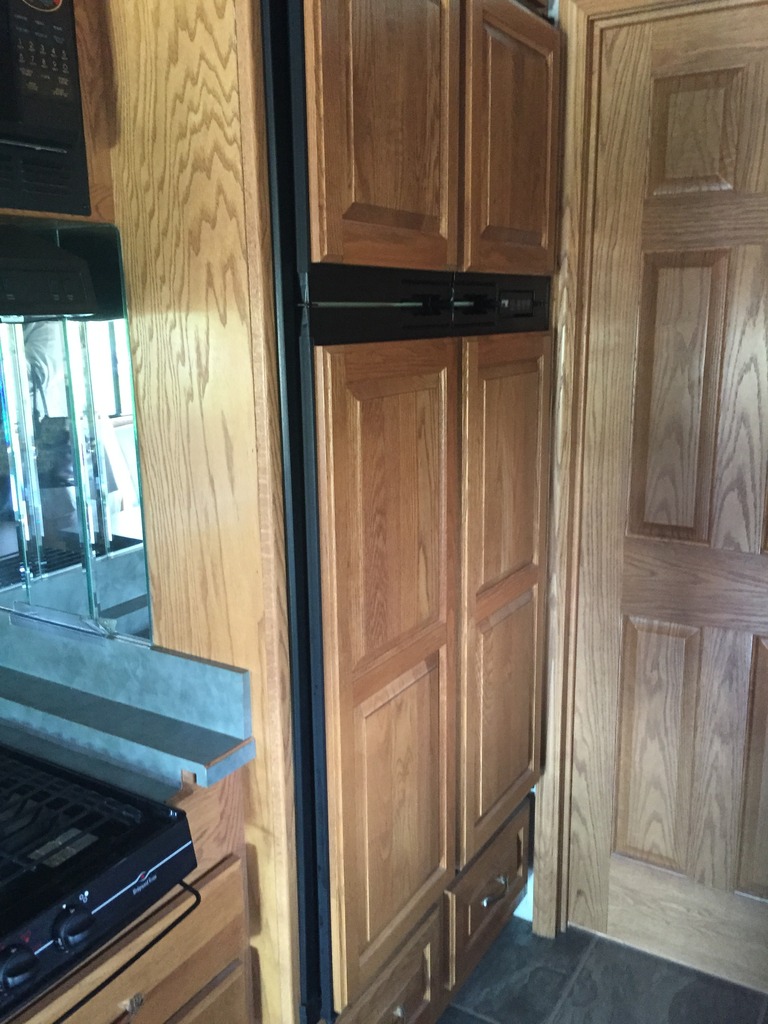
Here's the opening after the removal of the propane fridge:

You can kind of see the wood trim has a lip to it that I removed to make the opening bigger.
Here's the trim after the rough cut back (I later used a belt sander to smooth it out a bit):

Another one showing the trim cut back:

__________________
'03 Freightliner FL112, 295" wheel base, with '03 United Specialties 26' living quarters, single screw, Cat C12 430 h/p 1650 torque, Eaton 10speed , 3.42 rear axle ratio
|
|
|
|
|
|
| Thread Tools |
Search this Thread |
|
|
|
| Display Modes |
 Linear Mode Linear Mode
|
 Posting Rules
|
You may not post new threads
You may not post replies
You may not post attachments
You may not edit your posts
HTML code is Off
|
|
|
|
 » Recent Threads
 |
|
|
|
|
|
|
|
|
|
|
|
|
|
|
|
|
|
|
|
|
|
|
|
|
|


