Journey with Confidence RV GPS App RV Trip Planner RV LIFE Campground Reviews RV Maintenance Take a Speed Test Free 7 Day Trial ×

Go Back   Truck Conversion & Toterhome Community > Truck Conversion Talk > Building Your Own
Click Here to Login
Register FAQ Community Calendar Today's Posts Log in

Join Truck Conversion Today
Reply
 
LinkBack Thread Tools Search this Thread Display Modes
 
Old 05-20-2016, 05:58 PM   #1
Junior Member
 
Join Date: Mar 2016
Location: Monroe
Posts: 7
Default 359 Peterbilt Conversion

New to the forum and thought I'd share my project with you guys.

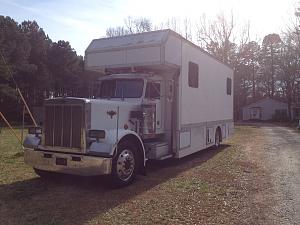
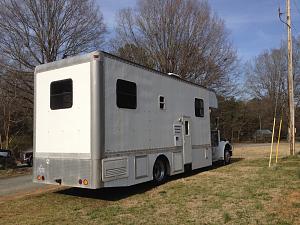
Mine is more of a finish/restore than the new builds that I've seen on this tread. The truck was originally converted around 06' by someone else. They had the frame stretched, deleted one of the drive axles, and added the 24'box. All of the tin work, plumbing and electrical were also done. The work done was all really nice but the project was never really finished on the inside. The original builder was really good with everything except wood work. Fortunately my father and I are both in the construction industry so that part is easy for us.

A little info on the truck itself. Its a 1985 Peterbilt 359 extended hood with a 400hp Cat and 15sp with overdrive. The engine was rebuilt and as had the fuel turned up, the power is impressive to be that big.

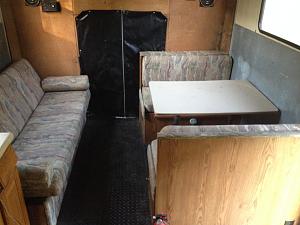
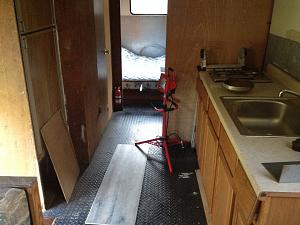
We've started tearing apart the interior of the box basically taking it down to the studs. The wife and I want to have a nice place to stay at the track on race weekends without spending a fortune. Due to the condition of the truck and a motivated seller we picked the truck up cheap.

Click image for larger version

Name:	IMG_1480.jpg
Views:	25
Size:	105.0 KB
ID:	2316Click image for larger version

Name:	IMG_1483.jpg
Views:	28
Size:	111.4 KB
ID:	2317

Looks like they used furniture from a donor travel trailer or rv. Which is probably where the Genset and water tanks came from as well.

Click image for larger version

Name:	IMG_1530.jpg
Views:	23
Size:	101.3 KB
ID:	2318Click image for larger version

Name:	IMG_1529.jpg
Views:	25
Size:	102.7 KB
ID:	2319

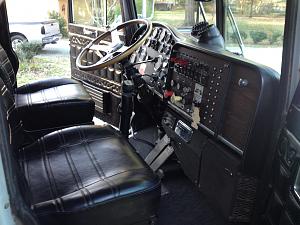
The nice part is the cab is all origional and in really nice shape to be over thirty years old.

Click image for larger version

Name:	IMG_1527.jpg
Views:	25
Size:	115.3 KB
ID:	2320
__________________

85 359 Pete is offline   Reply With Quote
Old 05-20-2016, 06:17 PM   #2
Junior Member
 
Join Date: Mar 2016
Location: Monroe
Posts: 7
Default

Demo was pretty easy since the previous owner simply screwed in the wall paneling. Just back out the screws and throw away!

We installed the new paneling by gluing and screwing cleats to the steel studs and cabinet frames. This allows us to nail the finished panels without having the not so pleasant looking exposed screws as it was done previously.
Click image for larger version

Name:	IMG_1597.jpg
Views:	16
Size:	103.9 KB
ID:	2322Click image for larger version

Name:	IMG_1598.jpg
Views:	17
Size:	105.1 KB
ID:	2321

A color scheme was decided since all of the cabinets and trim will be stain grade.
Click image for larger version

Name:	IMG_1594.jpg
Views:	11
Size:	104.8 KB
ID:	2323

The bed and bottoms of the rear cabinets were finished first. We hinged the mattress platform for storage underneath.
Click image for larger version

Name:	IMG_1601.jpg
Views:	14
Size:	100.3 KB
ID:	2324

Next the rear cabinets are finished and the upper wall cabinets were built and installed. We used short screws and high strength glue to hold the uppers to the fiberglass box walls. LED lights were added to the bottoms of the upper cabinets with false floors hiding the wiring for them.
Click image for larger version

Name:	IMG_1611.jpg
Views:	16
Size:	101.1 KB
ID:	2325


More to come!
__________________

85 359 Pete is offline   Reply With Quote
Old 05-20-2016, 08:20 PM   #3
Senior Member
 
samcrimm's Avatar
 
Join Date: Sep 2015
Location: Tullahoma
Posts: 361
Default

Nice! When I installed the washer dryer in my Rig screws were great, no split wood, no beating and bangin....

Sam
__________________
2005 Renegade #1204 42 footer Columbia M3200CH-435,12 speed auto Cat 12 kw Genset, Roadtrip Mission in-mot Dish Network, Washer dryer combo, Jeep Liberty toad,1973 Cessna Skylane,1955 Chev 210 Belair survivor
samcrimm is offline   Reply With Quote
Old 08-17-2016, 06:35 PM   #4
Junior Member
 
Join Date: Mar 2016
Location: Monroe
Posts: 7
Default

I have been away from the net for a while but steady working on the truck
We just got back from our first weekend out with it and while we had a few opportunities with it, it was a good test and I must say having the house at the track with you is very nice! The interior is about 85% compete now and now that we are done racing for the year I can focus on tightening up the loose ends.

We hung the new cabinets in near the celinig with LED lighting. Added a barn door style track in the bedroom, and carpeted the walls.
Attached Thumbnails
IMG_0162.jpg   IMG_0166.jpg   IMG_0164.jpg   IMG_0165.jpg  
85 359 Pete is offline   Reply With Quote
Old 08-17-2016, 06:38 PM   #5
Junior Member
 
Join Date: Mar 2016
Location: Monroe
Posts: 7
Default

We also built all of the kitchen cabinetry and installed all new 110v wiring
Attached Thumbnails
IMG_0170.jpg   IMG_0181.jpg   IMG_0171.jpg   IMG_0186.jpg  
85 359 Pete is offline   Reply With Quote
Old 08-18-2016, 06:53 AM   #6
Member
 
jasong's Avatar
 
Join Date: May 2015
Location: Full time on the road
Posts: 71
Default

Looks much better than the old RV furniture.
jasong is offline   Reply With Quote
Old 08-23-2016, 10:55 PM   #7
Senior Member
 
Join Date: Mar 2015
Location: Cincinnati
Posts: 146
Default

Nice work on the cabinets. Your upgrades will be nice for many years of enjoyment.
__________________

__________________
2005 Kenworth Showhauler 45 ft total length
twin screw, 450 hp ISX, 10 speed Ultrashift
38Chevy454 is offline   Reply With Quote
Reply


Posting Rules
You may not post new threads
You may not post replies
You may not post attachments
You may not edit your posts

BB code is On
Smilies are On
[IMG] code is On
HTML code is Off
Trackbacks are On
Pingbacks are On
Refbacks are On


Powered by vBadvanced CMPS v3.2.3

All times are GMT -5. The time now is 02:16 PM.


Powered by vBulletin® Version 3.8.8 Beta 1
Copyright ©2000 - 2024, vBulletin Solutions, Inc.
×