 |
 12-07-2013, 10:54 PM
|
#1
|
|
Junior Member
Join Date: Aug 2012
Posts: 5
|
 frame lengthening
Hello all I am just in the planning stages of my first build and am wondering what is the best way to lengthen a frame not sure what manufacturer i will go with thinking a peterbilt 379, looking to put an 18-22' box on the frame and also pull a race trailer. Any information you can find us appreciated.
__________________
|

|

|
|
12-08-2013, 03:12 PM
|
#2
|
|
Junior Member
Join Date: Dec 2013
Location: San Ramon
Posts: 6
|
I would like to know also and what do you do if the frame has a sticker stating "do not drill heat treated frame" like some of the trucks have.
__________________
|
|
|
|
|
12-12-2013, 10:49 PM
|
#3
|
|
Senior Member
Join Date: Mar 2009
Location: Beloit
Posts: 120
|
Pretty much if not all the frames will say don't heat/drill etc. on them. The top and bottom part of the "C" is a definite no no as far as drilling heating. The vertical part of the frame rail as long as it is done within reason is not really an issue for adding aditional holes. (provided you dont make it swiss cheese) I am in the process right now of having my Kenworth T2000 frame stretched. I went back and forth between doing it myself and having it done. I decided to have it done but learned alot along the way. I have a higher than normal tensile strength frame on mine as it is only 1/4" thick. More common I believe is 3/8" and not as high of strength. For my stretch I am adding 8' infront of the drives, and need about 7 feet out the back (planning to be 42 or 43 long, leaving the 6' condo sleeper and adding a 26' box). I ended up finding an identical frame with crossmembers as my current truck and had it cut under the cab. I am having it turned around backwards and butting it up to the rear of my exising frame. The frames will be butt welded and have a fish plate on the outside and a 2nd piece of "C" frame added to the inside 4' infront and behind the welded seam. This allows me to not alter the existing frame and saves on a bunch of labor to not have to re line up and drill all the holes for the suspension components for both axles.(atleast on my truck the axle mounts and air bags are all symetrical so they can be mounted forwards or backwards and it will still line up) By going this route I have the same frame rail that was built with the truck and only 1 seam that is supported both by being bolted fishplate on the outside through the existing frame and new inner frame as well as welded the original frame. Probably overkill but I am also pulling a 25k lb stacker trailer.
If you are only going with an 18 or 22' box you can probably get away with just dropping the front drive axle, and adding a few feet on the rear? Just depends on how much tail swing you want or don't want.
Good luck,
Steve
|
|
|
|
|
12-13-2013, 12:12 AM
|
#4
|
|
Junior Member
Join Date: Dec 2013
Location: San Ramon
Posts: 6
|
Thanks Steve for the reply, next question. Where do I find the frame rails to fit inside the stock rails?
I have seen an old friend just cut the frame in two and lengthen it with new rails to turn a tractor into a transfer truck, I guess I should have paid more attention to how it was done.
|
|
|
|
|
12-14-2013, 07:48 PM
|
#5
|
|
Senior Member
Join Date: Mar 2009
Location: Beloit
Posts: 120
|
I bought my frame rails from a local truck junk yard, Hribar Corporation
They are located off of HWY 94 in the Racine, Wi area. By the looks of your profile, you are in the California area? I would search for a truck junk yard in the area or contact a fabrication shop. Depending on how long of inner rails you are going with you could maybe have some made or find something close to the size and go with it. I was originally going to go with an "L" shaped inner rail as I had left over "C" rail that was too big to fit inside my current rail. I was going to cut the bottom part of the "C" off and just use it as a big "L". Would have been more than strong enough but I ended up coming across some "C" that fits pretty tight inside.
|
|
|
|
|
12-15-2013, 02:42 AM
|
#6
|
|
Junior Member
Join Date: Dec 2013
Location: San Ramon
Posts: 6
|
After I posted that I remembered that years ago I built a leg press machine and had a large steel shop in Oakland fabricate some large C channel for me out of 1/4" plate, they had a bender that could do very long sections. I will have to see if I can find their card.
|
|
|
|
|
12-18-2013, 04:41 PM
|
#7
|
|
Member
Join Date: Jul 2011
Posts: 74
|
Frame extension
I dropped the front drivers on my Pete 379 conversion and added a six foot extension to the rear using salvaged framerails from the local truck scrapper.
Then I placed a 16' Morgan box on top; all has gone perfectly for 25,000 miles.
Speed Gray
Grand Rapids, MI
__________________
Highway OPie (Speed Gray) Grand Rapids, MI: 2003 Peterbilt 379 Motorhome; 550 hp 6NZ Caterpillar C15, Eaton-Fuller 18 speed transmission, 3.36 rear; 63" sleeper and 16' Morgan box.(highwayopie@aol.com). There are many Peterbilts, but this one is mine!
|
|
|
|
|
01-06-2014, 09:49 AM
|
#8
|
|
Junior Member
Join Date: Jan 2014
Location: Port St. Lucie
Posts: 4
|
Cheapest way to purchase frame extensions is to go to a truck junkyard and get a piece from a salvaged truck frame. Truck frames are remarkably universal, the steel is 1/4 inch thick 12 inches high and the the flanges are 3 inch wide. You shouldn't drill the flanges and you shouldn't heat or weld the frame (tempered steel). That's the general rule discouraging the amateurs from doing it. In the real world of truck conversions and modifications, flanges are drilled and frames are welded, however with an experienced eye where and how it is done. The safest bet is to have a bonafide frame shop handle the work. I know it's "against the code" of you do-it-yourselves (who's gonna tell me I can't do it, I ain't paying nobody), but that's one area where you shouldn't "train yourself" how to do it.
Frame rails are a special tempered steel either 80,000 or 120,000 psi, very tough to bend or drill and tough to find. There is one company in Vermont that carries both, can cut it, shear it and bend frame rails upwards of 30 feet long, they service entire New England. We bought some from them when we did 6 foot rail extension and yes we welded it on. The material was not prohibitively expensive, but junkyard rails will be obviously cheaper and there is nothing wrong with using salvaged ones.
hjs
|
|
|
|
|
01-06-2014, 09:15 PM
|
#9
|
|
Junior Member
Join Date: Jan 2011
Posts: 12
|
I stretched my truck frame 11 feet. One of the truck salvage places nearby had a stack of brand new frame rails. My two frame rails cost me $300. I butt welded them...welded a diamond shaped gusset on the outside...and welded a 3 inch wide 1/2 inch thick 2 foot long piece of steel on the lower inside lip of the frame going across the splice. This is similar to how a local truck shop builds trucks that are actually used to haul weight. They leave out the diamond gusset and use a 6 inch long piece of steel on the bottom of the frame. Since I am not hauling near the load.....I am confident that it will hold.
|
|
|
|
|
01-06-2014, 10:04 PM
|
#10
|
|
Junior Member
Join Date: Jan 2014
Location: Port St. Lucie
Posts: 4
|
Here's another way to weld on rail extensions, a Z weld, which spreads the load nicely in the new structure (and the weld).
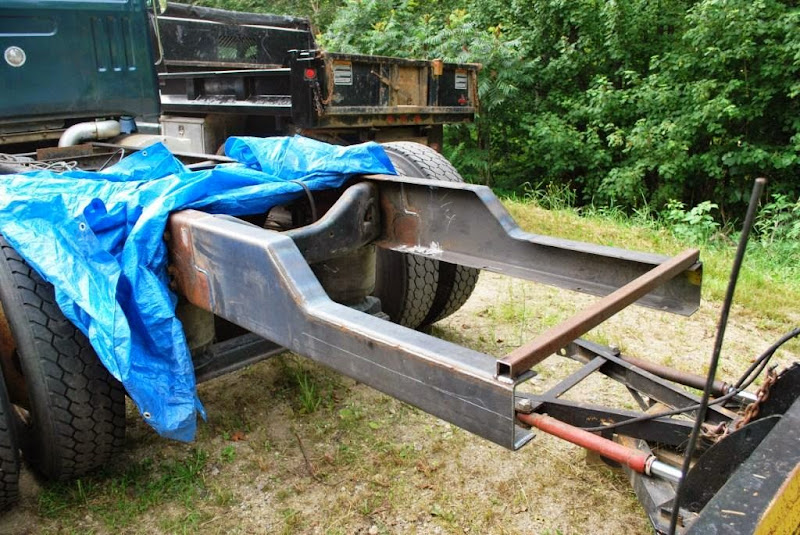 .
This extension required some serious strength since owner was planning to pull everything imaginable.

hjs
|
|
|
|
|
01-10-2014, 11:56 AM
|
#11
|
|
Senior Member
Join Date: Feb 2009
Location: St. Paul, MN
Posts: 1,819
|
Wow, it's great to see Henry (hjsdds) here! You guys, Henry is a wealth of knowledge on an amazingly vast array of subjects. And he's a very very good keyboard player.
Henry, that Z weld you speak of and show a picture. Is there no metal plate welded over the weld on the outside of the frame? It looks from your picture that there is nothing welded over the inside of the frame. Wouldn't some pieces of steel welded over both sides and extending front/rear several inches make it stronger?
__________________
'03 Freightliner FL112, 295" wheel base, with '03 United Specialties 26' living quarters, single screw, Cat C12 430 h/p 1650 torque, Eaton 10speed , 3.42 rear axle ratio
|
|
|
|
|
01-10-2014, 07:35 PM
|
#12
|
|
Junior Member
Join Date: Jan 2014
Location: Port St. Lucie
Posts: 4
|
Quote:
Originally Posted by Bob86ZZ4

Wow, it's great to see Henry (hjsdds) here! You guys, Henry is a wealth of knowledge on an amazingly vast array of subjects. And he's a very very good keyboard player.
Henry, that Z weld you speak of and show a picture. Is there no metal plate welded over the weld on the outside of the frame? It looks from your picture that there is nothing welded over the inside of the frame. Wouldn't some pieces of steel welded over both sides and extending front/rear several inches make it stronger?
|
Bob, this was a "challenge truck". First the original rails were cut very short. The rearmost vertical weld of the "Z" is, is where the rails ended. If we had more rails to work with we would probably opted for a long angled weld and do some fish-plating. We V-groved the joints on both sides and welded both sides, we felt that these weld were as good as you could make them. The we extended the 2 x 3 rectangular tube (ET hitch bottom spacer) into the Z and stitch welded the tube to both, the we extended the bumper angle bracket into, the Z and bolted it to both ends. I don't think the structure was going anywhere.
By the way, where we moved to is Jazz Central. Making serious inroads with the "locals".

You know musicians, when you move from "you can sit in", to "we want you back", that's significant.
hjs
__________________
|
|
|
|
|
| Thread Tools |
Search this Thread |
|
|
|
| Display Modes |
 Linear Mode Linear Mode
|
 Posting Rules
|
You may not post new threads
You may not post replies
You may not post attachments
You may not edit your posts
HTML code is Off
|
|
|
|
 » Recent Threads
 |
|
|
|
|
|
|
|
|
|
|
|
|
|
|
|
|
|
|
|
|
|
|
|
|
|


